

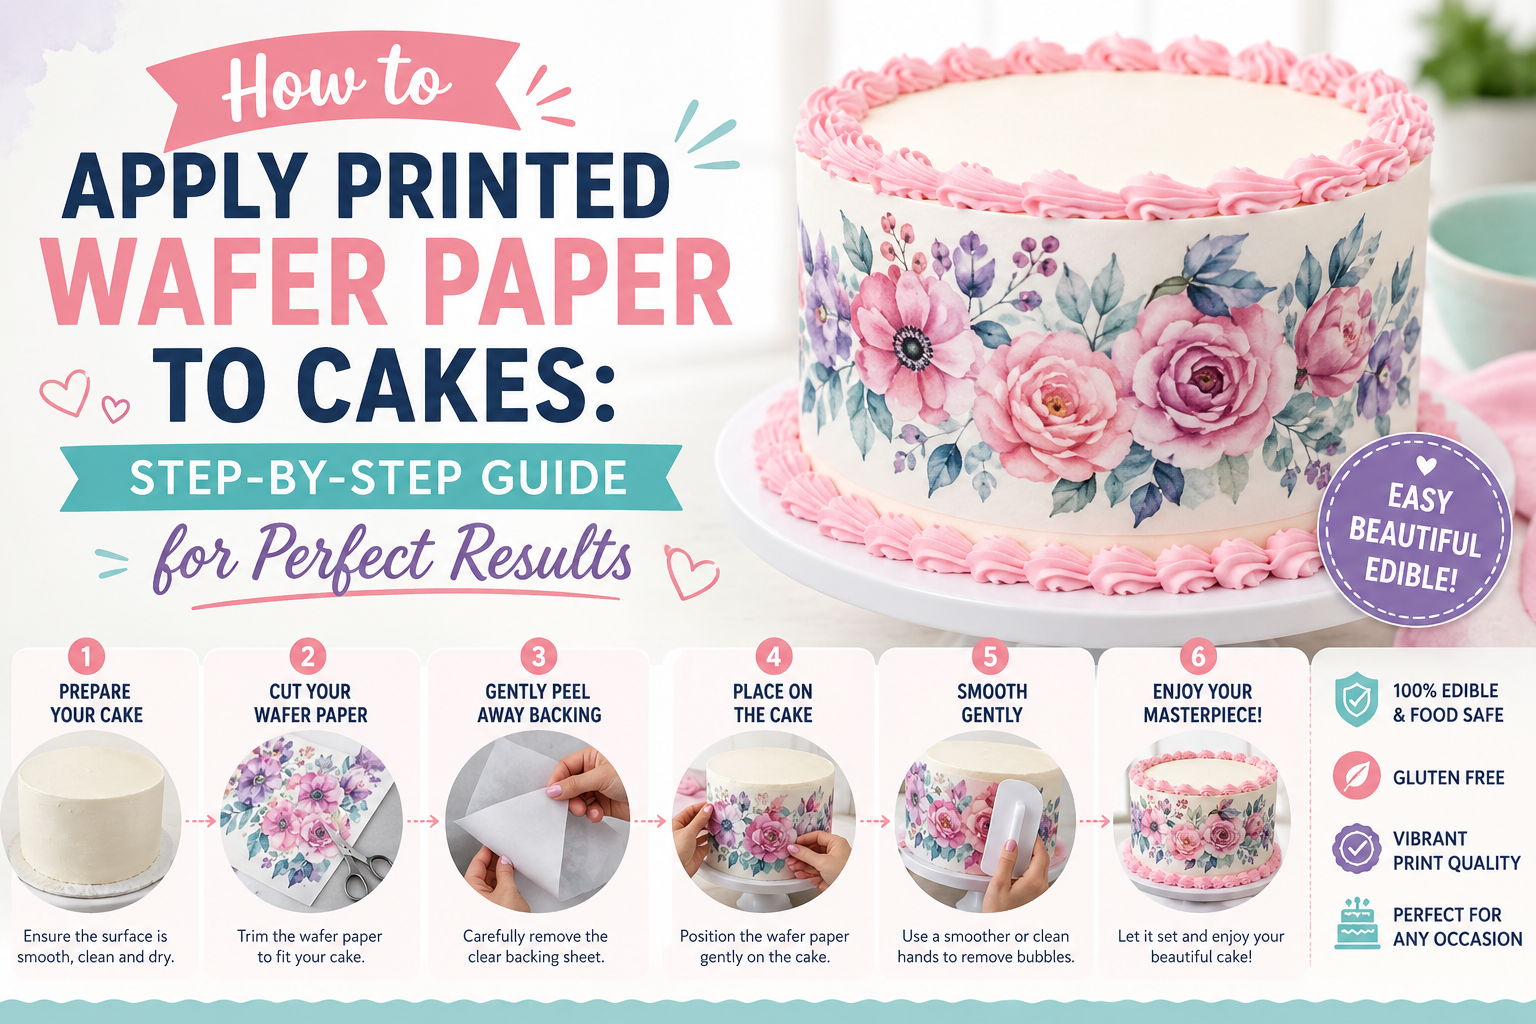
How to Apply Printed Wafer Paper to Cakes: Step-by-Step Guide for Perfect Results
How to Apply Printed Wafer Paper to Cakes: The Complete Step-by-Step Guide
Everything you need to know — what glue to use, how to apply wafer paper to buttercream, how to attach rice paper decorations, and pro tips for flawless results every single time.
Printed wafer paper — also called edible rice paper or edible wafer sheets — has transformed modern cake decorating. From delicate floral prints to full custom photographic scenes, wafer paper gives cakes a breathtaking, professional finish that's impossible to achieve with traditional frosting techniques alone.
But if you've never worked with it before, it can feel intimidating. It's thin, slightly fragile, and behaves differently from icing sheets. The good news: once you understand the basic rules — what glue to use, which frosting types work best, and exactly how to handle and place the paper — it becomes one of the easiest and most rewarding cake decorating techniques you'll ever learn.
At Custom Edible Sheets, we've helped thousands of home bakers and professional decorators get perfect results with our printed wafer paper products. This is the guide we wish existed when we started — thorough, practical, and honest about what works and what doesn't.
- What Is Printed Wafer Paper?
- Wafer Paper vs. Icing Sheets — What's the Difference?
- What Glue Can I Use for Wafer Paper?
- Which Frosting Types Work Best?
- Step-by-Step Application Guide
- How to Apply Wafer Paper to Buttercream Specifically
- How to Attach Rice Paper Decorations to Cakes
- Do's and Don'ts
- Troubleshooting Common Problems
- FAQ
BasicsWhat Is Printed Wafer Paper?
Wafer paper (also called rice paper or oblate paper) is a thin, edible sheet made primarily from potato starch, water, and vegetable oil. It's tasteless, colorless, and semi-transparent in its plain form — but when printed with edible food-safe inks, it becomes a vibrant, detailed decorating medium that can be applied to cakes, cookies, macarons, and more.
Printed wafer paper is the same product with a custom or pre-designed image printed directly onto it using professional food-grade inkjet printers. At Custom Edible Sheets, we print wafer paper using professional food-safe printing systems — not the basic desktop printers most sellers use — which means the colors are vivid, the detail is sharp, and the print quality is genuinely bakery-grade.
Key Properties of Wafer Paper to Know
Wafer paper is moisture-sensitive — this is both its most useful property (moisture is how it bonds to surfaces) and its biggest risk (too much moisture dissolves it). Understanding this is the foundation of every technique in this guide. Dry hands, controlled moisture, and quick application are your three golden rules.
CompareWafer Paper vs. Icing Sheets — What's the Difference?
Visual GuideApplication Overview — Illustrated
Study this illustration before you start. It shows the key techniques and steps for applying printed wafer paper cleanly and confidently. Click or tap to zoom:

Printed wafer paper application guide — illustration by CustomEdibleSheets.com
Glue GuideWhat Glue Can I Use for Wafer Paper?
This is the most searched question about wafer paper decorating — and for good reason. Wafer paper doesn't just stick on its own the way an icing sheet does. You need an edible adhesive between the wafer paper and the cake surface. Here are all your options, ranked from best to worst:
— Custom Edible Sheets Team
SurfacesWhich Frosting Types Work Best for Wafer Paper?
Not all cake surfaces are equal when it comes to wafer paper adhesion. Here's your complete reference:
Step-by-StepHow to Apply Printed Wafer Paper to Cakes — Complete Guide
Follow these steps in order for a perfect result every time. Read through all steps before you begin so nothing surprises you mid-process.
-
1🎂 Prepare Your Cake Surface
Your cake needs to be chilled and stable before applying wafer paper. If using buttercream, let it crust at room temperature for 20–30 minutes or refrigerate for 15 minutes to firm it up. If using fondant, ensure it's smooth, dry, and set. A stable, non-moving surface is critical — wafer paper is very thin and can tear if the surface beneath it shifts during application.
-
2✂️ Cut Your Wafer Paper to Size
Using clean, dry scissors or a sharp craft knife and ruler, cut your wafer paper to the size and shape you need. Work quickly and handle with dry hands — the oil and moisture from your fingertips can cause the paper to soften at the edges. If you're using a printed wafer paper topper from Custom Edible Sheets, it will already be cut to size — no trimming needed.
-
3🖌️ Apply Your Adhesive in a Thin, Even Layer
Using a soft pastry brush or offset palette knife, apply a very thin, even layer of your chosen edible glue (piping gel is recommended) to the cake surface where the wafer paper will sit. Less is more — you only need a thin veil of adhesive. Too much moisture will soak through the wafer paper and dissolve it from underneath. If in doubt, test the adhesive amount on a small scrap piece of wafer paper first.
-
4🤲 Place the Wafer Paper Immediately
Pick up the wafer paper with clean, dry hands or food-safe gloves and place it on the prepared surface within 30 seconds of applying the glue — before the adhesive begins to dry. Lay it down from one edge to the other in a slow rolling motion, like placing a decal, rather than dropping it flat all at once. This prevents air bubbles from being trapped underneath.
-
5🖐️ Smooth Gently from Center Outward
Using clean, dry fingertips or a soft dry brush, gently smooth the wafer paper from the center outward toward all edges. Work slowly and apply very light pressure — wafer paper can tear if you press too firmly. Any trapped air bubbles can be carefully coaxed to the nearest edge. Small wrinkles at the edges of a flat panel are normal and will usually flatten as the paper absorbs the minimal moisture and adheres.
-
6⏰ Allow to Set for 10–15 Minutes
Give the wafer paper 10–15 minutes to fully bond to the cake surface. During this time, keep the cake at room temperature away from humidity and steam. You'll see the wafer paper settle and become nearly invisible against the surface as it adheres — this is exactly what you want. Don't refrigerate during this initial setting period if avoidable.
-
7🎉 Add Final Touches and Serve
Once set, you can add any additional decorations, piping borders, or finishing touches around the wafer paper. Serve within 24–48 hours for the best visual appearance — wafer paper is at its most vibrant and crisp soon after application. If storing, keep the cake covered in a cool, dry location away from humidity.
ButtercreamHow to Apply Wafer Paper to a Buttercream Cake
Buttercream is the most common frosting used by home bakers — and it requires a slightly different approach than fondant. Here's the exact technique:
- Crust the buttercream first. American buttercream (butter + powdered sugar) forms a dry outer crust within 20–30 minutes at room temperature. This crusted surface is much more stable for wafer paper than soft, freshly piped buttercream.
- Chill the cake if needed. If your buttercream is soft, Italian, or Swiss meringue-based (which don't crust), refrigerate the frosted cake for 20–30 minutes until the surface is firm to the touch before applying wafer paper.
- Apply a thin layer of piping gel over the buttercream. This creates a moisture barrier that prevents the buttercream's water content from soaking through the wafer paper too quickly, giving you more working time for a clean application.
- Work quickly. Once piping gel is on buttercream, the clock is ticking. Have your wafer paper ready to place before you touch the gel brush to the cake.
- Keep it cool after application. Refrigerate the finished cake until 30 minutes before serving — but keep it in a closed box to prevent the wafer paper from absorbing refrigerator humidity.
Buttercream Pro Tip: The Smoothing Trick
After applying the wafer paper to buttercream, place a piece of parchment paper on top of it and gently run a flat smoother or the palm of your hand across it. The parchment protects the paper's printed surface while you smooth. Remove the parchment after 30 seconds. This gives a flawlessly flat finish with no fingerprint marks.
Rice PaperHow to Attach Printed Rice Paper Decorations to Cakes
"Rice paper" and "wafer paper" are the same product — just different names used in different regions. The term "rice paper" is more common in the UK and Australia; "wafer paper" is used more in the US. The decorating techniques are identical.
Beyond flat panels, wafer/rice paper can be shaped into 3D decorations — butterflies, flowers, ruffles, bows, and architectural elements — then attached to cakes in a variety of ways:
RulesWafer Paper Do's and Don'ts
- ✅Work with completely dry hands or food-safe gloves at all times
- ✅Store wafer paper flat in its sleeve until the moment you need it
- ✅Use piping gel as your first-choice adhesive for the most reliable results
- ✅Apply adhesive in a thin, even layer — the thinnest possible coat
- ✅Place the wafer paper immediately after applying adhesive
- ✅Chill the cake first if using buttercream or soft frosting
- ✅Handle wafer paper by its edges only to avoid fingerprints on the design
- ✅Allow 10–15 minutes to set before moving or boxing the cake
- ❌Never handle wafer paper with wet or damp hands
- ❌Never apply wafer paper to a freshly frosted, soft surface without chilling first
- ❌Never use too much adhesive — it will dissolve the paper from below
- ❌Never leave wafer paper exposed to humid air for long before placing
- ❌Never refrigerate uncovered — condensation will damage the print
- ❌Never use oil-based adhesives — they do not bond with wafer paper
- ❌Never fold or crease wafer paper unless intentionally shaping for 3D decorations
- ❌Never apply near steam, a hot oven, or direct heat
Fix ItTroubleshooting Common Wafer Paper Problems
| ⚠️ Problem | ✅ Solution |
|---|---|
| Wafer paper is dissolving or becoming soggy | Too much moisture. You used too much adhesive or the cake surface was too wet. Start over with a new piece of paper and use just a whisper-thin coat of piping gel. If your buttercream is very soft, refrigerate the cake 20+ minutes before trying again. |
| Wafer paper won't stick and keeps lifting | Too little adhesive or the surface is too dry/firm. Apply a slightly thicker (but still thin) layer of piping gel, or try tylose glue for a stronger bond on dry fondant surfaces. |
| Air bubbles under the paper | Bubbles form when the paper is placed flat all at once. Next time, lower from one edge in a rolling motion. For existing bubbles, gently smooth toward the nearest edge with a soft dry brush. Very small bubbles usually settle on their own. |
| Wafer paper is wrinkling or curling | This happens when one side of the paper receives more moisture than the other. Ensure your adhesive layer is perfectly even. Work quickly after placing — the paper will often flatten as the adhesive sets. |
| The printed design is smearing or bleeding | Moisture touched the printed surface. Always apply adhesive to the CAKE surface, not the wafer paper. Handle the paper from its edges and avoid touching the printed face. |
| Wafer paper tore during handling | The paper was too dry/brittle or handled too roughly. Wafer paper can be softened very slightly by briefly exposing it to a humid environment (near a pot of just-boiled water for 30 seconds) to make it more pliable. Handle with both hands, supporting the full sheet. |
| Edges are curling up after application | Apply a tiny dab of piping gel under each curling edge using a small paintbrush, then gently press and hold for 15 seconds. A toothpick can help apply adhesive to very small edge areas. |
SafetyIs Printed Wafer Paper Safe to Eat?
Yes — all wafer paper and printed wafer paper from Custom Edible Sheets is completely food safe and fully edible. The paper itself is made from potato starch, water, and vegetable oil. The inks are FDA 21 CFR compliant food-grade edible inks.
FAQFrequently Asked Questions
How do you normally stick wafer paper to a cake?
The standard method is to apply a thin layer of clear piping gel to the cake surface (not the wafer paper), then immediately place the wafer paper on top and smooth gently from the center outward. Piping gel provides just enough moisture to bond the paper without dissolving it.
Can I apply wafer paper directly without any glue?
On very tacky fresh buttercream or fresh fondant, wafer paper can sometimes adhere without glue — but this is unreliable and not recommended. Always use at least a thin layer of piping gel for consistent results.
How far in advance can I apply wafer paper to a cake?
For best results, apply wafer paper no more than 24 hours before serving. It looks most crisp and vivid soon after application. If stored, keep the cake in a cool, dry environment in a closed cake box — never exposed to refrigerator humidity.
What's the difference between wafer paper and edible icing sheets?
Wafer paper is thin, slightly translucent, potato starch-based, and more flexible — better for 3D shapes and side wraps. Icing sheets are thicker, opaque, sugar-based, and easier for beginners to apply as flat toppers. Both are fully edible. We offer both at Custom Edible Sheets.
Can I cut printed wafer paper with a die-cut or punch?
Yes — wafer paper can be cut with scissors, a sharp craft knife, or even craft punches and die-cutting machines for custom shapes. Work quickly with dry tools and handle by the edges to avoid moisture from your hands softening the cut area.
My wafer paper order arrived looking fine. How do I store it until I need it?
Keep it in the original sealed sleeve, stored flat in a cool, dry place. Avoid the refrigerator, avoid areas with steam or humidity, and avoid direct sunlight. Stored correctly, wafer paper stays in excellent condition for several weeks.
🌾 Ready to Try Wafer Paper on Your Next Cake?
Shop our collection of professionally printed wafer paper and edible cake toppers — personalized, food-safe, and shipped within 1 business day.
🛒 Shop CustomEdibleSheets.comSummaryYou're Ready to Decorate
Printed wafer paper opens up a world of decorating possibilities that simply aren't achievable with frosting alone. Once you understand its key rule — control the moisture, work quickly, and handle gently — it becomes an intuitive and endlessly creative tool in your cake decorating arsenal.
Start with a flat topper on a fondant or crusted buttercream cake using piping gel as your adhesive. Nail that technique a couple of times, then graduate to side wraps, 3D flowers, and butterfly decorations. Within a few cakes, you'll wonder how you ever decorated without it.
🔗 Shop wafer paper and edible cake toppers:
Rectangle Sheet Cake Toppers ·
Round Cake Toppers ·
Browse All Designs at CustomEdibleSheets.com