

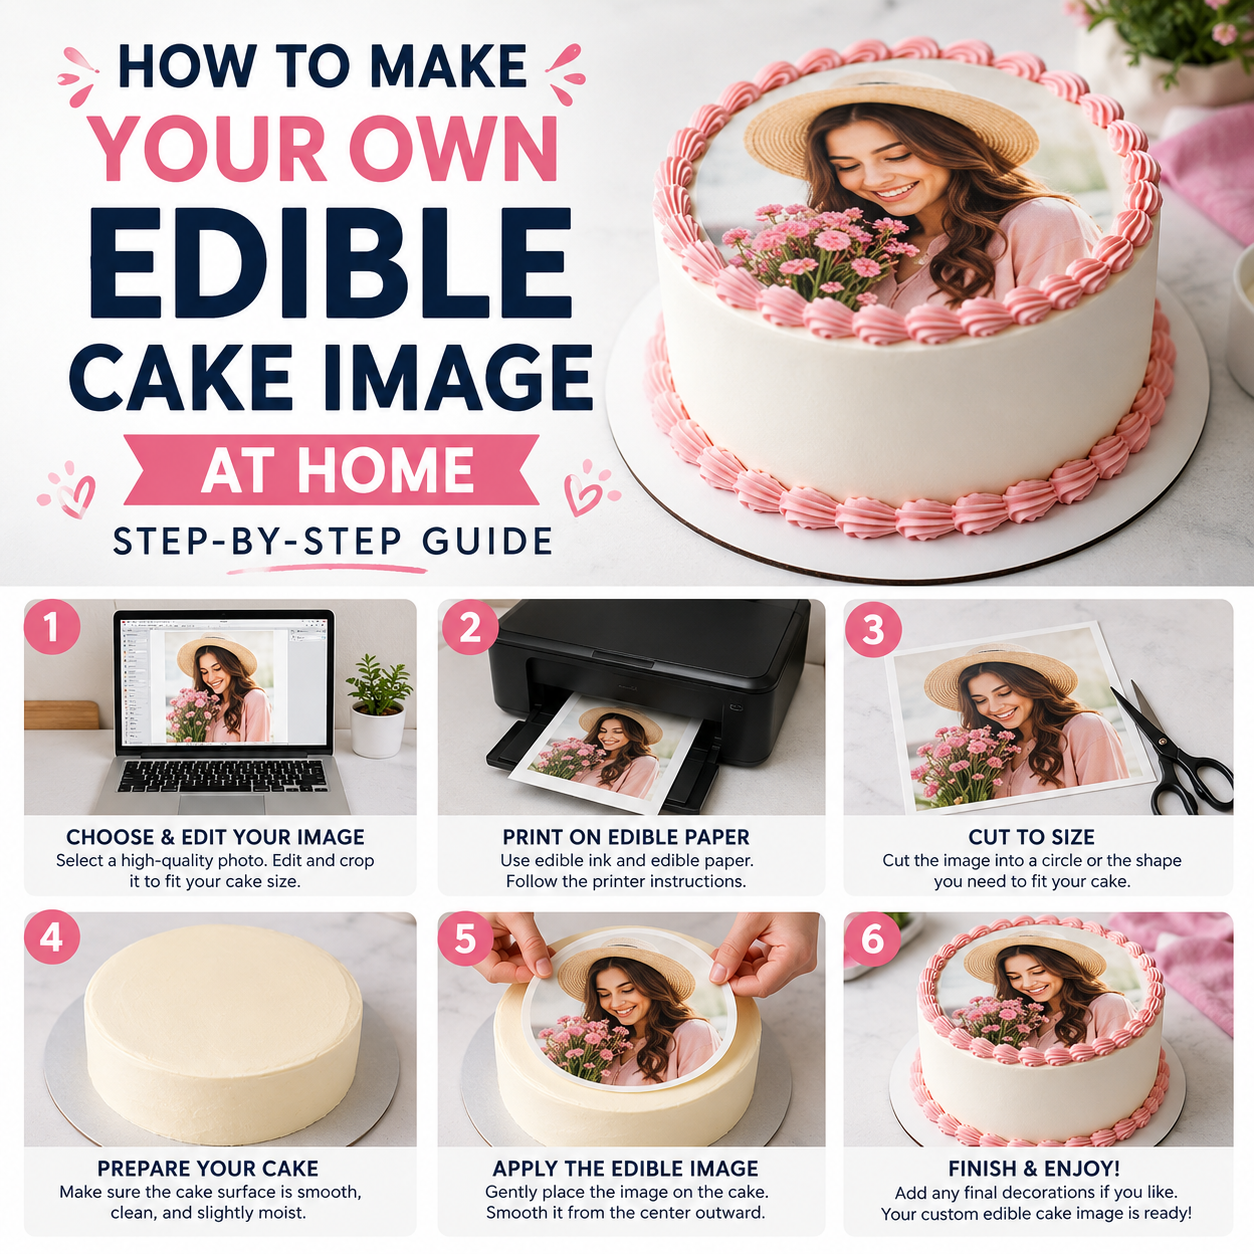
How to Make Your Own Edible Cake Image at Home (Step-by-Step Guide)
An edible cake image (sometimes called an edible cake topper, frosting sheet, or wafer paper print) is a photo, logo, or design printed directly onto a thin, food-safe sheet using certified edible ink. Once printed, the sheet is peeled off its backing and placed directly on top of frosting, fondant, or buttercream — no baking required, no special tools needed at the table. It's tasteless, odorless, and 100% safe to eat, which is why bakeries and home bakers alike use it to put photos, logos, and custom artwork on birthday cakes, wedding cakes, corporate cakes, and cupcakes.
The two most common materials are frosting sheets (soft, blends seamlessly into buttercream) and wafer paper (thinner, slightly crisp, great for layered or 3D effects). Either way, the process of preparing your image is exactly the same.
Before you open any editing software, the single biggest factor in how your topper turns out is the quality of your starting image.
- Use the original file, not a screenshot. Screenshots compress and blur images — always go back to the original photo or download the highest-resolution version available.
- Aim for at least 300 DPI at the final print size. A photo that looks sharp on your phone screen can still print blurry, because screens display at a much lower resolution than printers.
- Good lighting beats a fancy camera. Well-lit, in-focus photos with clear subjects always print better than dark or grainy ones.
- Avoid heavily compressed images saved from text messages, Instagram, or Facebook — they're often downsized for web use and will look pixelated when enlarged.
- For logos, get the source file if you can (AI, EPS, SVG, or a high-res PNG with transparent background) instead of a small JPG pulled off a website.
You don't need professional design software to make a great edible image, but if you want to crop, remove a background, add text, or combine multiple photos, here's how the most common tools stack up:
Canva (Free / Browser-Based)
The easiest option for most people. Drag-and-drop editing, free background remover, thousands of templates, and you can set a custom canvas size to match your topper's exact dimensions before designing.
Tip: Export as PNG at the highest quality setting for the sharpest print.Adobe Photoshop
The professional standard for photo editing — ideal for color correction, layering multiple photos, retouching, and precise background removal.
Tip: Work in RGB mode and set resolution to 300 DPI under Image > Image Size before exporting.Adobe Illustrator
Best for logos, text-based designs, and anything that needs to scale perfectly without losing quality, since it works with vector shapes instead of pixels.
Tip: When exporting, rasterize at 300 DPI so the file matches your topper's print size exactly.Microsoft Word
Surprisingly useful in a pinch! You can insert a photo, crop it, add a text box for a name or message, and use "Save as Picture" to export it as a JPG or PNG.
Tip: Set your page size to match the topper dimensions first, so nothing gets cut off when exported.Photopea (Free, Browser-Based)
A free, no-download tool that mimics Photoshop almost exactly — layers, filters, background removal, and PSD support, all running in your browser.
Tip: Great if you already know Photoshop shortcuts but don't have a subscription.GIMP (Free, Open-Source)
A powerful free desktop alternative to Photoshop. More of a learning curve, but excellent for detailed edits, layering, and precise color adjustments.
Tip: Use Image > Print Size to set DPI to 300 before flattening and exporting.Pixlr & Fotor (Browser-Based)
Beginner-friendly browser editors with one-click background removal, filters, and simple text tools — a nice middle ground between Canva and Photoshop.
Tip: Both have free background-remover tools, handy for clean logo cutouts.Phone Editing Apps
Apps like Snapseed or PicsArt work well for quick crops, brightness fixes, and simple text overlays directly from your phone before uploading.
Tip: Export at the app's maximum resolution setting, never the "for sharing" compressed option.Every cake shape needs a different canvas size. As a general rule, your topper should sit about ½–1 inch smaller than the surface it's covering, so a clean frosting border frames the design.
| Cake Type | Suggested Topper Size |
|---|---|
| Smash cake / mini cake | 4"–6" Round |
| Standard birthday cake | 7"–9" Round |
| 9×13" sheet cake | 9 × 13" Rectangle |
| Cupcakes | 2"–3" Circles (set of 6, 12, 18 or 30) |
| Full cake side wrap | 10.5" × 2.5" Strips (set of 3) |
- Resolution: 300 DPI or higher at final print size.
- File format: PNG (best for designs with transparent backgrounds or sharp text) or high-quality JPG (best for photos).
- Color mode: RGB — this is what almost all home and commercial edible printers expect.
- Crop ratio: Matches your chosen topper shape exactly (round, square, rectangle, or heart).
- No tiny text: Keep lettering large and bold — fine print can blur once printed on a soft frosting sheet.
- Double-check spelling on any names, dates, or messages — once it's printed, it's printed!
Once your image is edited and exported, you have two options depending on whether you have your own edible printer at home.
You Own an Edible Printer
- Make sure your printer is loaded with genuine, food-grade edible ink cartridges — never regular ink.
- Load your frosting sheet or wafer paper onto its backing card according to your printer's manual; most require a rigid carrier sheet to feed correctly.
- In your print settings, select the highest photo-quality setting and set the paper size to "actual size" — never "fit to page," which can stretch or crop your design.
- Run a test print on regular paper first to double-check cropping and color before printing on the actual edible sheet.
- After printing, let the sheet air-dry for the time recommended by your ink and paper manufacturer (often 10–20 minutes) before handling.
- Store unused sheets flat, in their original sealed packaging, away from heat, humidity, and direct sunlight until you're ready to use them.
You Don't Own a Printer
- Head over to our custom edible cake topper page.
- Choose your shape and size — round, rectangle, heart, cupcake set, or wrap strips.
- Upload your edited image using our built-in upload tool, and add any personalization text if you'd like.
- We print your design on certified food-grade edible ink, on either frosting sheet or wafer paper, and ship it fast in protective packaging.
- When it arrives, simply peel and place on fresh, slightly chilled frosting — no equipment, no mess.
Screen colors and printed colors aren't identical. Edible ink can render slightly warmer or cooler than what you see on your monitor, so for big events, consider ordering a small test size first before committing to a large sheet. Apply your finished topper to fresh, slightly chilled frosting and smooth gently from the center outward, avoiding contact with wet fingers on the printed surface. It works beautifully on buttercream, fondant, whipped icing, and even store-bought cakes.
- Using a low-resolution social media download instead of the original photo file.
- Forgetting to crop to the correct shape before exporting, which can cut off faces or text.
- Tiny or thin fonts that lose legibility once printed on a soft sheet.
- Designing right up to the edge with no margin, leaving no frosting border to frame the image.
- Waiting until the last minute — give yourself a few days of buffer before the event for editing, ordering, and shipping.
Don't Have an Edible Printer? We've Got You Covered.
Upload your edited photo or logo and we'll print it on certified food-grade edible ink and ship it fast — any size, any shape, any occasion.
Order Your Custom Edible Cake Topper →⚠️ For best results, upload a high-resolution image. Our team will reach out if any adjustments are needed before printing.
All edible inks are FDA 21 CFR compliant and 100% food safe. Facility does not handle tree nuts, peanuts, or dairy.