

🥇 How to Cut Edible Images for Round Cakes and Cupcakes: The Complete Guide
How to Cut Edible Images for Round Cakes & Cupcakes
The complete technique guide — clean cuts, perfect circles, and professional results every single time. No special equipment required.
You just received your beautiful custom edible image from Custom Edible Sheets — now what? Most edible images are printed on full rectangular sheets, which means for round cakes and cupcakes you'll need to cut them to shape. The great news: with the right technique it takes just a few minutes and the result looks completely professional. This guide walks you through both scenarios — round cakes and cupcakes — with step-by-step instructions, a full size chart, pro tips, and the complete visual infographic to guide you as you work.
Why Do Edible Images Need to Be Cut?
Custom edible images — also called frosting sheets, icing sheets, or edible photo toppers — are printed on A4 or letter-size rectangular sheets for efficient printing. When you order a custom round cake topper or cupcake toppers from Custom Edible Sheets, your design arrives printed on a sheet and needs to be trimmed to the exact circle size of your cake or cupcake top.
Round Cakes
- Rectangular sheet must be trimmed to a circle
- Circle should match the decorated top diameter
- Common round cake sizes: 6", 8", 10", 12"
- Sharp scissors give the cleanest edge
- A perfect cut edge hides against the frosting border
Cupcakes
- Multiple images printed per sheet — each needs punching out
- Round cookie cutters give perfectly uniform circles fast
- Standard cupcake top: 2" (5 cm) diameter
- Jumbo cupcakes: 2.5" – 3" diameter
- Mini cupcakes: 1.5" diameter
💡 Want to Skip the Cutting?
At Custom Edible Sheets, you can order your edible images pre-cut to round shapes — just select the round option and your preferred diameter at checkout and we'll cut them for you before shipping. No scissors, no fuss.
Tools You Need — And What to Avoid
You don't need any fancy equipment. Most of what delivers the best results is already in your kitchen. Here's what to reach for — and what to put back in the drawer.
Sharp Scissors
The single most important tool for round cakes. Dull blades crush and crack the edge. Kitchen or fabric scissors work best.
Round Cookie Cutter
The fastest, most accurate tool for cupcake circles. Press firmly and twist gently for a clean punch-through every time.
Ruler or Tape Measure
Measure the cake top diameter before marking. Precision here saves waste and ensures a perfect fit.
Toothpick or Food Pen
Score a light guide circle on the backing paper (never on the print side). A toothpick indent is enough to follow.
Clean Cutting Mat
A flat, dry, stable surface protects the edible image while cutting. Never cut on a damp counter or paper towel.
Bowl or Pan as Template
No compass? Trace the rim of a bowl or round pan matching your cake diameter as a cutting guide on the backing.
⚠️ Never Use These
- Dull or serrated scissors — they tear, fray, and crack the edge
- Craft knives or box cutters — too easy to over-cut and split the sheet
- Wet or damp hands — moisture softens edible paper instantly
- A pizza cutter or rolling blade — it compresses and cracks icing sheets
- Paper towels as a cutting surface — they introduce moisture from below
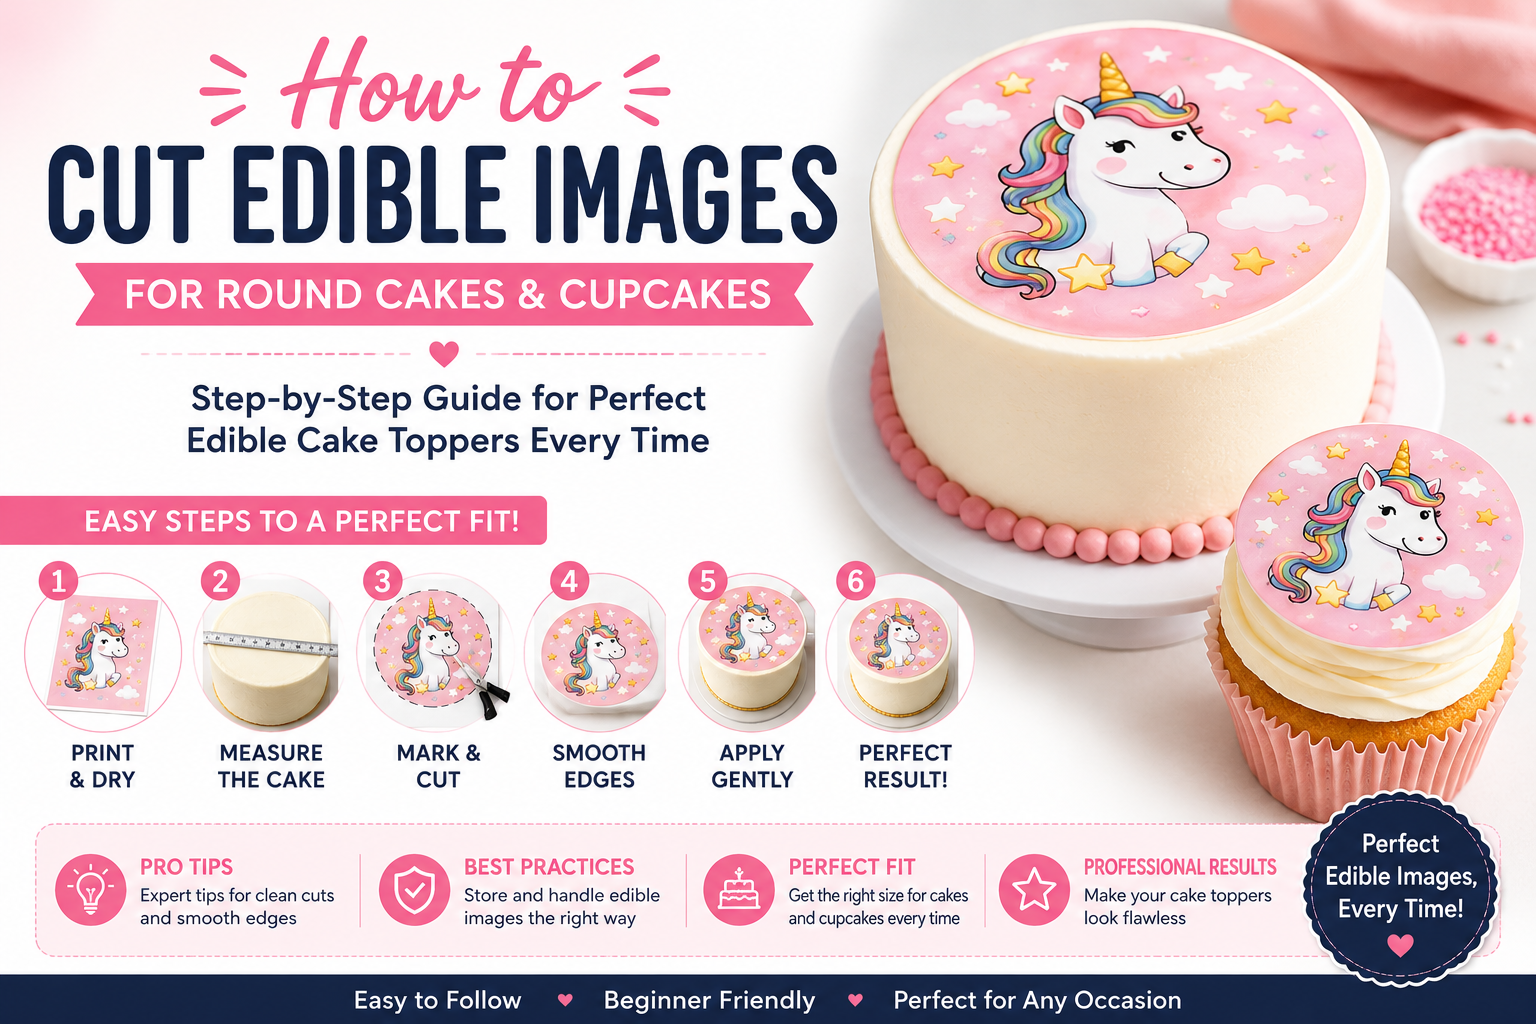
Visual Step-by-Step Guide
The infographic below shows the complete process for both round cakes and cupcakes — bookmark this page or pin the image to reference while you work on your next creation.

How to Cut Edible Images for Round Cakes & Cupcakes · Step-by-Step Visual Guide by Custom Edible Sheets
Follow these six steps for a perfectly cut edible image that fits your round cake like it was made to measure — because it was. Order your custom round cake edible image at customediblesheets.com and it arrives printed, dried, and ready to cut.
Print & Let Dry Completely
If printing at home, print your edible image and let it rest flat on a clean, dry surface for at least 15–30 minutes before touching it. Cutting a freshly printed, still-damp sheet stretches and tears the edges. Edible images ordered from Custom Edible Sheets arrive pre-dried and can be cut immediately upon arrival.
Measure Your Cake's Top Diameter
Use a ruler or flexible tape measure across the top of your frosted cake from one outer edge to the other. Write down this number in inches or centimeters. Common sizes: 6", 8", 10", 12" rounds. For best results, subtract ¼" from this measurement — the frosting will fill the tiny gap and the image will sit perfectly centered with a clean frosting border around the edge.
Mark the Circle on the Backing
Flip the edible image face-down on your dry cutting mat. On the backing paper only (not the print side), use a toothpick, compass, or food-safe pen to lightly mark a circle at your measured diameter. You can also trace around the rim of a round cake pan, bowl, or plate that matches your target size — no compass needed.
Cut Slowly & Smoothly Along the Line
Pick up your sharpest scissors. Cut along the marked line using long, continuous strokes — not short, choppy snips. The secret to a clean edge is rotating the edible image toward the scissors (rather than moving the scissors in a wide arc) while keeping the blade perpendicular to the paper. Take your time — one smooth pass beats ten jagged ones.
Peel & Place on Your Cake
Starting at one corner, slowly peel the plastic backing away from the edible image. Hold the image by its edges and center it directly above your frosted cake. Lower it gently and smooth from center outward using a clean, dry fingertip — this pushes out any air bubbles and bonds the image to the frosting. Never press hard in the center; always work outward.
Finished — Your Round Cake Is Transformed!
Step back and enjoy your work. For the most vivid colors and crispest edges, serve within 24–48 hours of applying. If storing overnight, keep the cake loosely covered in the refrigerator — never sealed in an airtight container, which causes condensation that softens and blurs the image. Shop more designs at customediblesheets.com.
🌿 Round Cake Pro Tips
- Chill your frosted cake for 30 minutes before applying — a firmer frosting surface makes placement much easier and prevents shifting
- Hold the edible image up to the cake (still backed) to check centering before peeling anything — reposition before you peel, not after
- If the image shifts after placement, gently lift from one edge and reposition — do not drag it across the frosting surface
- White or pale frosting gives the most vivid color payoff — dark frosting can show through the slightly translucent edges
- A light mist of water on a very dry or crusted frosting surface helps the image adhere instantly
Cupcake edible images use a slightly different approach — here a round cookie cutter is your best friend for perfectly uniform circles across an entire batch in under five minutes.
Print & Dry Your Cupcake Sheet
Your cupcake sheet from Custom Edible Sheets contains multiple images arranged in a grid — typically 12 to 24 toppers per A4 sheet depending on the diameter selected. Allow to dry completely if printed at home. Sheets ordered online arrive pre-dried and ready to cut immediately.
Choose the Right Cutter Size
Measure the flat top area of your frosted cupcake — this is the area the edible image will cover. Most common sizes: 2" (5 cm) for standard cupcakes, 2.5" (6.5 cm) for large cupcakes, 1.5" (3.8 cm) for mini cupcakes. Your cutter should match the flat frosting surface, not the width of the paper liner.
Press the Cutter Through the Image
Place your edible sheet face-up on a clean, dry, hard cutting mat. Center your round cutter over one image. Press straight down with firm, steady, even pressure and twist slightly if needed. Do not rock the cutter — one straight press gives the cleanest punched edge. The cutter will cut cleanly through both the icing sheet and the backing paper.
Lift & Remove the Excess Paper
Raise the cutter straight up. The punched circle should remain inside. If your cutter has a plunger, press it to eject the circle cleanly. If not, use a clean toothpick to gently lift the cut circle out of the cutter and set it face-up on a clean surface. The excess sheet falls away. Repeat for each image on the sheet.
Place on the Frosted Cupcake
Hold the edible circle by its edge between two fingertips. Position it directly above the center of the frosted cupcake top, then lower it flat. Press lightly from center outward to secure. For freshly piped, soft frosting, the image will adhere immediately. If the frosting surface is slightly dry, a tiny touch of water on the frosting helps the image grip without smearing.
Done — A Beautiful Batch Every Time!
Repeat across your full tray. With a little practice, a sheet of 12 cupcake toppers takes under 5 minutes to cut and apply. For a stress-free shortcut, order your cupcake toppers pre-cut to any round size directly from Custom Edible Sheets — we do all the cutting before shipping.
💜 Cupcake Pro Tips
- Cut all circles from the full sheet before applying any — then apply as a fast batch
- Keep your round cutter completely clean and dry between punches — even a tiny drop of moisture will stick to the next circle
- No cutter the right size? Use the top of a narrow ramekin or glass as a template, then cut with scissors following the circle
- Pipe your frosting flat across the top (not in a swirl) for the cleanest, most polished edible image placement
- Store unused cut circles flat, separated by parchment, in a sealed container away from all humidity
- Do not use water directly on edible images — only a tiny drop on the frosting surface if needed
Edible Image Size Chart for Round Cakes & Cupcakes
Use this reference table when ordering your custom edible image from Custom Edible Sheets — it covers every standard cake and cupcake size so you always order exactly the right dimensions.
| Cake / Cupcake | Diameter (Top) | Recommended Edible Image | Best Cutting Tool |
|---|---|---|---|
| Mini Cupcake | 1.5" / 3.8 cm | 1.5" circle | Round cookie cutter |
| Standard Cupcake | 2" / 5 cm | 2" circle Most Popular | Round cookie cutter |
| Large Cupcake | 2.5" / 6.5 cm | 2.5" circle | Round cookie cutter |
| Jumbo Cupcake | 3" / 7.5 cm | 3" circle | Round cookie cutter |
| 6" Round Cake | 6" / 15 cm | 5.75" circle | Sharp scissors |
| 8" Round Cake | 8" / 20 cm | 7.75" circle Most Popular | Sharp scissors |
| 10" Round Cake | 10" / 25 cm | 9.75" circle | Sharp scissors |
| 12" Round Cake | 12" / 30 cm | 11.75" circle | Sharp scissors |
| 14" Round Cake | 14" / 35 cm | 13.75" circle | Sharp scissors |
* Recommended image sizes are ¼" smaller than the cake diameter to leave a clean frosting border. Order any size at customediblesheets.com.
Do's & Don'ts When Cutting Edible Images
✓ Always Do This
- Use sharp, clean scissors — replace if blades feel dull
- Work on a completely dry, flat surface
- Allow home-printed images to dry 15–30 min before cutting
- Cut with long, smooth continuous strokes
- Measure cake diameter before marking your circle
- Handle edible images with clean, dry hands only
- Seal leftover edible images immediately after cutting
- Apply to a slightly chilled, firm frosting surface
- Work quickly once the backing is peeled
✗ Never Do This
- Use dull, serrated, or office scissors
- Handle with wet or damp hands
- Cut on a wet, damp, or sticky surface
- Use a craft knife, pizza cutter, or rolling blade
- Leave the edible image exposed to open air or steam
- Try to cut straight from cold refrigerator storage
- Apply to hot, warm, or still-wet freshly iced surfaces
- Fold or crease the edible image — it will crack at the fold
- Store applied cakes in airtight containers — condensation blurs the image
Storing Leftover Edible Images After Cutting
Have leftover circles or a partial sheet? No problem — proper storage keeps them in perfect condition until your next cake.
🧊 Short-Term Storage — Up to 2 Weeks
Place cut circles or partial sheets between parchment paper sheets and store flat in a sealed zip-lock bag. Keep in a cool, dry location at room temperature — not the fridge. Refrigerator humidity causes icing sheets to become tacky and wafer paper to soften and curl.
📦 Long-Term Storage — Up to 12 Months (Uncut)
Unopened, sealed edible images stored in a cool, dark, dry place last up to 12 months. Once cut or opened, use within 2–4 weeks for best color quality. Always add a food-safe silica desiccant packet to the storage bag to absorb any ambient moisture and prevent sticking.
🚫 The #1 Thing That Ruins Edible Images
Moisture. Even brief exposure to steam, kitchen humidity, condensation from the fridge, or wet hands permanently damages edible images — causing colors to bleed, paper to curl, and images to become sticky and unusable. Always keep edible images sealed in their original packaging until the exact moment you are ready to cut and apply them.
✂️ You're Ready to Cut Like a Pro
Cutting edible images perfectly is a skill you'll master on your very first try. Sharp scissors for cakes, a clean round cutter for cupcakes, a dry surface, and patient hands — that's truly all it takes.
And if cutting feels like too much, remember you can always order your images pre-cut to any round size from Custom Edible Sheets — ready to peel and place the moment they arrive.
Frequently Asked Questions
The questions we hear most often about cutting and applying edible images — fully answered.
Order Your Custom Edible Image Today 🎂
Any photo. Any logo. Any design. Printed on premium food-safe icing sheets and shipped ready to use — for round cakes, cupcakes, and everything in between.
Shop Custom Edible Sheets →Free shipping · FDA certified · Food-safe edible ink · Ships in 1–2 business days