

How to Apply Edible Cake Images Like a Pro (Step-by-Step Guide)
How to Put an Edible Sheet on a Cake — and Get It Perfect
No bubbles. No cracks. No sticky disasters. Just a flawless edible image on your cake, every single time — with our complete beginner-to-pro guide.
Applying an edible sheet to a cake comes down to four things: a smooth, slightly chilled frosting surface, careful peeling of the backing sheet, positioning from center outward, and giving the sheet time to soften and bond. Get those right and you'll have a flawless result. This guide walks you through every step — and covers what to do when things go wrong.
What You'll Need
Before you begin, gather everything you need. Working with edible sheets requires a clean, dry workspace and a few simple tools. Most of these you likely already have in your kitchen.
Important: Keep your edible sheet sealed in its original packaging until the exact moment you are ready to apply it. Exposure to air, heat, or humidity can cause the sheet to dry out and crack, or go limp and sticky.
Preparing the Cake Surface
The condition of your cake's surface before you apply the edible sheet is the single most important factor in getting a clean, professional result. A rushed or improperly prepared surface causes bubbles, wrinkling, and sheets that slide off.
Regardless of the frosting type you're using, the goal is the same: a smooth, even, slightly tacky surface that gives the edible sheet something to grip onto.
The Golden Rule: Chill Before You Apply
Once your cake is frosted, place it in the refrigerator for 15 to 20 minutes before applying the edible sheet. This light chilling does two things: it firms the frosting surface so the sheet has a stable foundation, and it creates a very slight tackiness on the surface of buttercream and ganache — which acts like a gentle adhesive for the icing sheet.
Do not chill for too long. More than 30–40 minutes in the fridge can cause the frosting to become too hard and dry, reducing the surface tack you need for adhesion.
Tip: For fondant-covered cakes, brush a very thin, even layer of piping gel or water over the fondant surface just before applying the sheet. This gives the edible sheet the light stickiness it needs, since fondant dries to a non-tacky finish.
Smoothness Matters More Than You Think
Edible icing sheets are thin and slightly flexible, but they cannot conform to large bumps, lumps, or ridges in the frosting. Any imperfection in the cake's surface will show through the edible sheet after application. Use a bench scraper or offset spatula to get your frosting as smooth as possible before chilling. This step is worth the extra few minutes — a perfectly smooth cake produces a perfectly smooth edible print.
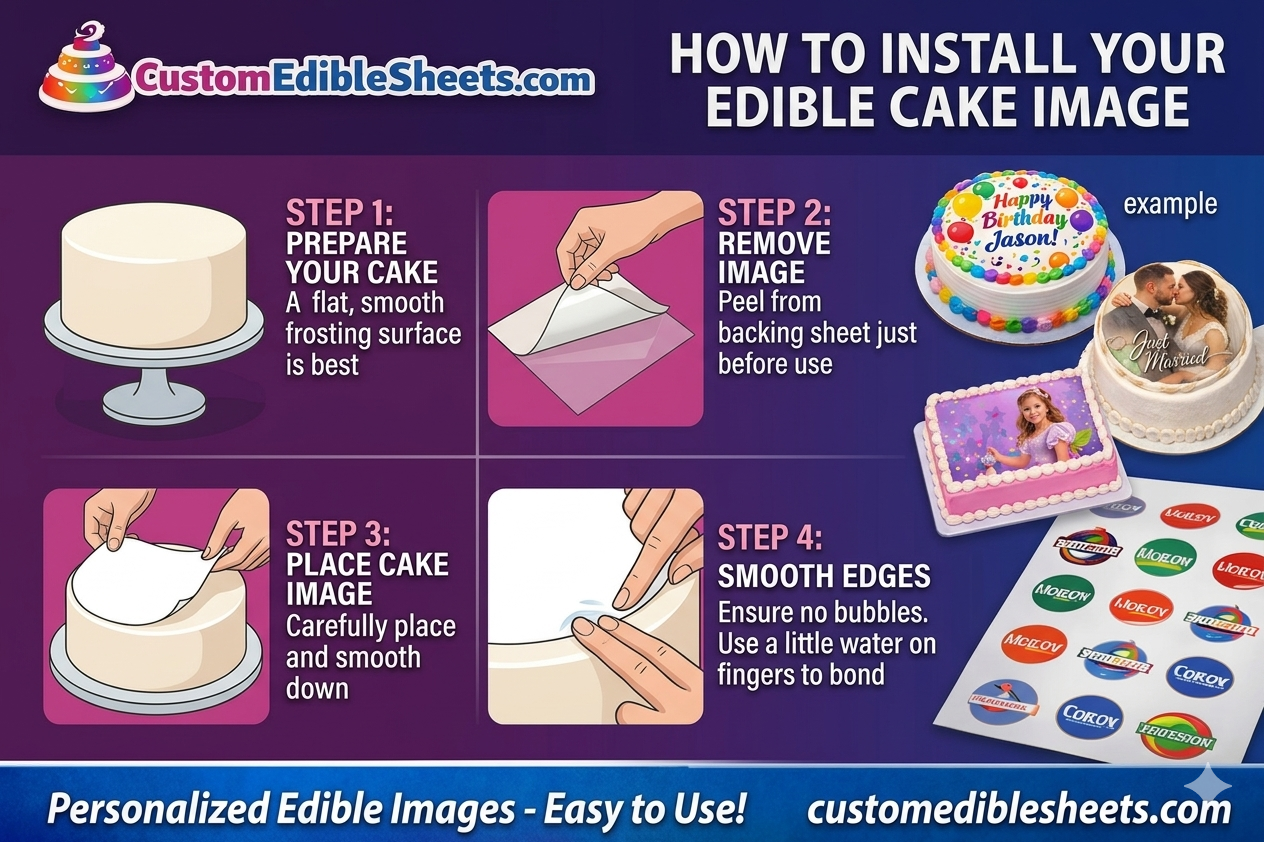
How to Apply an Edible Sheet to a Cake
Follow these steps in order for a clean, bubble-free result every time.
Measure and Trim the Sheet (If Needed)
Before removing the backing, lay the edible sheet — still in its packaging — against the top of your cake to check the sizing. If your sheet is larger than the cake top, trim it to size with clean, dry scissors while it's still on the backing sheet. This protects the printed surface and gives you a cleaner cut.
For round cakes, you can trace a circle template with a toothpick lightly on the backing sheet, then trim along that line. For square or rectangular cakes, simply trim to the dimensions of the cake top.
Wash and Dry Your Hands
This step sounds obvious, but it matters more than most people realize. Clean, completely dry hands are essential when handling edible sheets. Any grease, moisture, or food residue on your hands can transfer to the sheet's surface and damage the print or cause it to stick to your fingers rather than the cake.
If you have naturally warm or sweaty hands, consider wearing thin food-safe gloves for this step. You can also lightly dust your fingertips with powdered sugar to reduce sticking.
Peel the Backing Sheet Slowly and Carefully
Take the edible sheet out of its packaging and lay it face-up on a clean, flat surface. Hold one corner of the plastic or paper backing sheet and peel it away slowly at a low angle — don't pull straight up, as this can tear the edible sheet. Peel back about one-third of the backing to start.
If the edible sheet sticks stubbornly to the backing, do not force it. Instead, let it rest at room temperature for 2–3 minutes. The slight change in temperature often releases the adhesion. You can also very gently flex the backing sheet from side to side to loosen the bond.
Position the Sheet Over the Cake
Take your cake out of the refrigerator and set it on a flat, stable surface. Hold the edible sheet by its edges — try not to touch the printed surface — and position it directly above the center of the cake, oriented the correct way. Take a moment to confirm the alignment before lowering it, because once it makes contact with the frosting it will start to adhere immediately.
If you're placing a portrait or image with a specific orientation (like a photo or text), make sure you haven't accidentally flipped it before it touches the cake.
Lower from the Center Outward
This is the most critical motion of the entire process. Lower the center of the sheet onto the cake first, making gentle contact, then let the sheet settle outward toward the edges on its own. Do not lay the entire sheet down flat all at once — this traps air underneath and causes bubbles.
Think of it like applying a screen protector to a phone: start in the middle and work outward. Once the center is placed, use the flat of your palm or a soft spatula to smooth from the center toward each edge with steady, even strokes, pushing any trapped air out as you go.
Remove Any Remaining Backing and Smooth Edges
If you only peeled back part of the backing in Step 3, now gently peel away the rest while continuing to smooth the sheet with your other hand. Work slowly and keep the sheet taut — don't let it fold or crease during this step.
Once the full sheet is laid down, use the edge of a flat spatula or cake smoother to press the edges firmly but gently against the cake surface, ensuring there are no lifted corners or air pockets along the perimeter.
Let the Sheet Soften and Bond
Once applied, leave the cake at room temperature for 5 to 10 minutes. During this time, the moisture from the frosting migrates gently into the edible sheet, softening it and causing it to bond firmly to the cake surface. You'll notice the sheet begins to look more integrated with the frosting — the edges become less defined and the overall look becomes seamless.
Resist the urge to touch or adjust the sheet during this time unless you spot a bubble that needs fixing. Movement now can cause wrinkling.
Tips by Frosting Type
Not all cake surfaces behave the same way when you're applying an edible sheet. Here's what to know about each frosting type.
The natural fat and slight stickiness of buttercream makes it ideal for edible sheets. Chill until firm, then apply directly — no extra adhesive needed. Works best when freshly frosted and smooth.
Fondant dries to a smooth but non-tacky surface, so brush a thin layer of piping gel or clear corn syrup over the area first. Apply the sheet immediately while the gel is still wet.
Ganache works well when chilled to a matte, firm finish. Avoid applying on shiny or still-wet ganache — the oils can cause the sheet to slide. A light chill (10–15 min) is all you need.
Whipped cream is very soft and high in moisture. The edible sheet can dissolve quickly. Work fast, chill the cake thoroughly, and apply the sheet only immediately before serving.
Similar to buttercream, but slightly softer. Chill well before applying. Cream cheese frosting's natural moisture is usually sufficient for adhesion without any extra gel.
Applying directly to sponge is not recommended. Brush the cake surface with a thin layer of simple syrup or piping gel first to create an adhesive layer before placing the edible sheet.
Troubleshooting Common Problems
Even experienced bakers run into issues. Here are the most common problems and exactly how to fix them.
| Problem | Likely Cause | Fix |
|---|---|---|
| Air bubbles under the sheet | Sheet laid flat all at once | Use a toothpick to pierce bubbles, then smooth gently outward with your fingertip |
| Sheet is cracking when peeled | Dried out / too cold | Place face-down on a barely damp paper towel for 20 sec to rehydrate |
| Sheet is sticking to itself | Too humid / backing removed too early | Work in a cool, dry room; keep backing on until moment of application |
| Colors look faded after applying | Frosting moisture absorbed into sheet | Apply to a better-chilled surface; use fondant for crispest color retention |
| Sheet slides or shifts on the cake | Surface too wet or too slick | Chill the cake longer; use piping gel on fondant; avoid ganache at room temp |
| Edges lifting or curling | Not enough pressure at edges | Press edges firmly with a smoother; apply a tiny amount of piping gel to anchor |
| Sheet tears during application | Handled too roughly / too cold | Let it warm to room temperature 2 min before applying; handle by edges only |
| Wrinkles in the sheet | Sheet placed unevenly | Lift the sheet gently from the edge and reposition before it fully adheres; work faster next time |
Timing and Storage
How Far in Advance Can You Apply an Edible Sheet?
You can apply an edible sheet to a frosted cake up to 24 to 48 hours before serving, which makes it ideal for preparing wedding cakes, birthday cakes, and event cakes a day ahead. After application, the edible sheet will continue to soften and integrate into the frosting over time — by the time the cake is served, the result is a seamlessly blended, professional-looking finish.
How to Store a Cake with an Edible Sheet Applied
Store the decorated cake in a cool, dry environment — ideally at room temperature in a cake box or loosely covered. If refrigerating, place the cake in a box and avoid covering it tightly with plastic wrap, which traps condensation and can cause the colors to bleed or the edible sheet to dissolve.
For fondant-covered cakes with an edible sheet, refrigeration is generally not recommended unless the filling absolutely requires it, as fondant can sweat when removed from the fridge and the moisture can affect the edible sheet.
Never freeze a cake with an edible sheet already applied. The freeze-thaw cycle causes the sheet to crack and the colors to bleed significantly. If you need to freeze the cake, do so before applying the edible sheet and add the sheet after thawing and re-frosting.
Pro Tips for Perfect Results
Use Piping Gel as Your Secret Weapon
Professional cake decorators swear by piping gel. A very thin, even layer brushed over a fondant surface creates the perfect tacky base for an edible sheet to grip. It's also useful for anchoring stubborn lifting corners or edges after application. Keep a small pot of clear piping gel at your workstation any time you're working with edible sheets.
Work in a Cool, Dry Kitchen
Humidity is the enemy of edible sheets. On a humid day, edible sheets can become soft and sticky within minutes of being opened, making them very difficult to handle. If your kitchen is warm or humid, turn on the air conditioning or a dehumidifier before starting. Even 15 minutes of reduced humidity in the workspace can make a dramatic difference.
Practice Your "Center-First" Technique
If you're new to edible sheet application, the center-first technique takes a little practice before it becomes muscle memory. For your first few cakes, consider doing a dry run with a plain piece of paper cut to the same size as your edible sheet, just to get comfortable with the motions before working with the real thing.
For Side Panels: Work in Sections
If you're decorating the sides of a cake with edible sheets — for a full wraparound design, for example — cut the sheet into manageable sections that are no wider than about 4–5 inches each. Apply them one at a time, overlapping slightly at the seams. This is far easier than trying to wrap a single large sheet around a curved surface.
Let the Image Do the Work
One common mistake beginners make is over-handling the edible sheet after it's placed. Once it's down and smoothed, leave it alone. The frosting will do the rest of the work. Excessive touching, pressing, and adjusting is the fastest way to introduce fingerprints, smears, or new air bubbles into a sheet that was going on perfectly.
Frequently Asked Questions
No — you should never wet an edible icing sheet before applying it to a cake. The moisture from a freshly frosted buttercream or chilled ganache cake is more than enough for the sheet to adhere. Wetting it can dissolve the sugar surface, damage the printed image, and cause the sheet to fall apart before it reaches the cake.
Yes — in fact, applying an edible sheet to a lightly chilled cake is recommended. The chilled frosting provides a firm, slightly tacky surface that helps the sheet adhere cleanly. Just don't chill the cake for too long before applying, as an overly hard or dry surface will reduce adhesion. Around 15–20 minutes of refrigeration is the sweet spot.
Smooth the sheet from the center outward using the flat of your palm or a cake smoother immediately after application. For stubborn air bubbles that remain, use a clean pin or toothpick to gently pierce the center of the bubble, then smooth the air out toward the puncture with your fingertip using light circular pressure.
You can apply an edible sheet up to 24–48 hours before the cake is served. Store the decorated cake in a cool, dry place or loosely covered in the refrigerator. Avoid airtight containers as condensation can cause the colors to bleed or the edible sheet to dissolve at the edges.
Cracking almost always means the edible sheet has dried out — usually from being left open, stored in a very dry environment, or handled when too cold. To fix it, place the sheet face-down on a very lightly damp (not wet) paper towel for 20–30 seconds to rehydrate it slightly, then retry the application immediately.
Absolutely — edible sheets work beautifully on cupcakes. The process is identical: chill the frosted cupcake briefly, peel your pre-cut edible topper from its backing, center it over the cupcake, and gently press from the center outward. Pre-cut round toppers in standard cupcake sizes make the process even quicker and easier.
Buttercream is the easiest and most forgiving frosting to use under an edible sheet. Its natural fat content provides just the right amount of tackiness, and it smooths out to an ideal surface. Fondant also produces excellent results, especially for vivid color preservation, though it requires a thin layer of piping gel first to create adhesion.
Order Your Custom Edible Sheets Today
Upload your photo, logo, or design and receive a professionally printed custom edible sheet — ready to apply to any cake in minutes.
Shop Custom Edible Sheets →