

How to Apply an Edible Image Without Air Bubbles
How to Apply an Edible Image Without Air Bubbles
The complete guide to perfectly smooth, bubble-free edible prints — every single time.
You've got a beautiful edible print, a perfectly frosted cake — and then it happens: little air bubbles form under the sheet and ruin the look. Air bubbles are the second most common problem bakers face with edible images, right after cracking. The good news? They're almost entirely preventable. This guide tells you exactly why they happen and how to stop them before they start.
Why Do Air Bubbles Form Under Edible Images?
Understanding the cause is the fastest path to the fix. Air bubbles form when air gets trapped between the edible sheet and the frosting surface during placement. Here are the most common reasons:
The biggest culprit is technique — specifically, placing the entire sheet down flat simultaneously instead of using a gradual rolling motion. The second biggest culprit is frosting surface quality. Let's fix both.
Before You Start: Get Your Surface Right
A smooth, properly prepared frosting surface is the foundation of a bubble-free application. No technique in the world fully compensates for a bumpy or improperly set base.
What you want
Smooth, even frosting. Slightly cool and firm to the touch. Gently tacky — not wet, not bone dry. No crumbs, dips, ridges, or air pockets in the frosting itself.
What to avoid
Warm, soft frosting. Lumpy or textured surfaces. Frosting that's too dry or too wet. Condensation on a cold cake. Any gap between frosting and cake board edge.
How to get the perfect surface
After frosting, use a bench scraper or offset spatula to get your surface as smooth and flat as possible. Run the scraper under warm water, dry it, then do one final smooth pass — the warmth gently levels any ridges. Refrigerate the cake for 15–20 minutes until the frosting is just firm, then bring it out and apply the image within 5 minutes of removing from the fridge.
Press a Viva brand paper towel (the smooth, non-textured kind) flat against your buttercream immediately after smoothing. The flat surface of the towel irons out any remaining texture and creates a glass-smooth finish — the ideal base for an edible image.
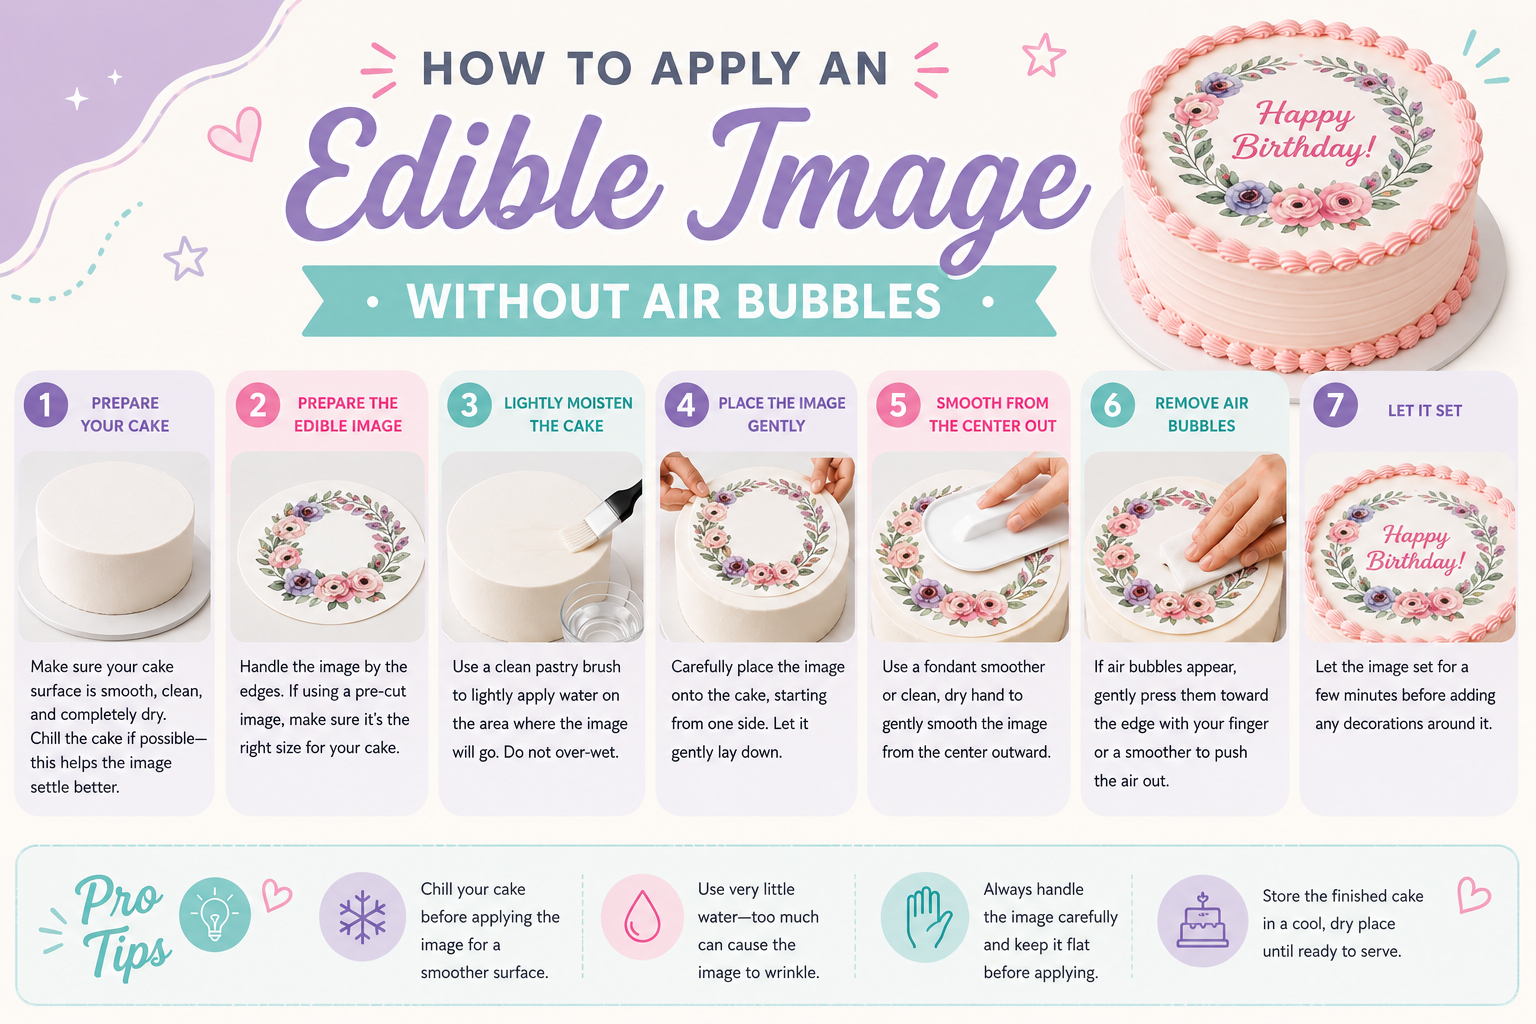
Step-by-Step: How to Apply an Edible Image Without Air Bubbles
Remove the Sheet From Packaging at the Last Moment
Keep the edible image sealed until you are completely ready to apply it — cake chilled, workspace clear, tools within reach. Leaving it open in dry air causes it to stiffen, which makes it harder to conform to the surface smoothly and increases bubble risk.
Let the Sheet Relax for 2–3 Minutes
After opening, lay the sheet face-up on a clean flat surface for 2–3 minutes. This allows it to relax and become slightly more pliable. A relaxed, flexible sheet conforms to the frosting surface far more easily than a stiff, cold one — dramatically reducing air pocket formation.
Trim Before Peeling — Then Align Before Touching the Cake
Trim to size before removing the backing. Then, holding the sheet by its backing, hover it over the cake and align it visually before committing. Repositioning after the sheet touches frosting drags air under it. Get your alignment right before the sheet makes contact.
Peel the Backing Only Halfway — Use the "Hinge Method"
Instead of fully removing the backing, peel it back only halfway. Fold the backing under itself so the exposed half of the edible sheet hangs free while the other half is still protected. This gives you control and prevents the sheet from flopping down all at once.
Place the Exposed Half First — Roll, Don't Drop
Starting from one edge of the cake, gently lower the exposed half of the sheet onto the frosting using a slow rolling motion — like lowering a window blind. This sweeping motion pushes air outward rather than trapping it. Do not lower the entire sheet flat all at once.
Smooth the First Half Before Continuing
Once the first half is placed, use a clean, smooth paper towel or the flat of your hand to gently smooth from the center of the placed section outward to the edge. Work any air out toward the free edge. Apply light, even pressure — never press down with fingertips, which creates dents and new air pockets.
Peel Away the Remaining Backing and Roll the Second Half
While holding the placed half flat with one hand, use your other hand to slowly peel away the remaining backing from the second half of the sheet. As the backing comes free, guide the remaining sheet down onto the frosting in the same rolling motion — moving from the already-placed section outward.
Final Smooth — Full Surface, Center to Edges
With the full sheet now placed, do a final smooth pass over the entire image using a smooth paper towel or a fondant smoother. Work in slow, deliberate strokes from the absolute center of the image outward in all directions. Think of it like smoothing a screen protector — steady, outward pressure.
Check Edges and Tuck Them Down
Run a clean offset spatula or your fingertip along all four edges to press them gently into the frosting. Edges are the most common place for air to sneak back in. If an edge lifts slightly, press it down firmly and hold for 5–10 seconds — body warmth from your fingertip softens the frosting just enough to re-seal it.
Let It Set Undisturbed for 10–15 Minutes
Place the cake somewhere stable and leave it completely undisturbed for at least 10–15 minutes. The edible sheet softens and bonds to the frosting surface during this time. Moving or jostling the cake during this window is one of the most common ways new bubbles form after a perfect application.
What to Do If Bubbles Appear After Placement
Don't panic. Most bubbles can be fixed — especially if you catch them early.
Small bubbles near the edge
Gently lift the nearest edge of the edible sheet with a clean offset spatula. Smooth the bubble outward and re-press the edge down. Hold for 5–10 seconds. For very small edge bubbles, simply pressing firmly with a smooth paper towel is often enough to push them out.
Small bubbles in the center
Use a clean toothpick or a thin cake-decorating pin to make a single tiny prick in the center of the bubble. Press down gently from the edges of the bubble inward with a smooth paper towel — the air will escape through the prick. The tiny hole will be virtually invisible once the sheet settles.
Large bubbles across a wide area
If a large section hasn't adhered, carefully peel back that section slowly and lay it down again using the rolling method. Work quickly — the longer the sheet has been on the cake, the more moisture it has absorbed, making it more fragile to reposition.
Never press down hard on a bubble with your full palm or fingertips. This can crack the edible sheet or create a dent in the frosting beneath it, trading one problem for another. Always use a smooth paper towel and light, even pressure.
Which Frosting Types Are Most Bubble-Prone?
| Frosting Type | Bubble Risk | Why & What to Do |
|---|---|---|
| American Buttercream | Low | Naturally tacky, grips immediately. Lowest bubble risk of all frostings. |
| Swiss / Italian Meringue Buttercream | Low–Medium | Silkier surface. Chill the cake 20–25 min for a firmer grip before applying. |
| Fondant (smooth) | Medium | Less tacky — use a thin layer of piping gel on the fondant to bond the sheet instantly. |
| Ganache (set) | Medium | Very smooth surface can cause sliding. Allow ganache to cool fully; apply quickly. |
| Cream Cheese Frosting | Low | Tacky when chilled. Works well — apply within 5 min of removing from fridge. |
| Whipped Cream | High | Too soft and wet. Sheet will slide and trap air. Apply immediately before serving only. |
| Royal Icing (fully dried) | Medium | Very smooth and non-tacky. Brush lightly with water to create adhesion before applying. |
Extra Pro Tips for Bubble-Free Results
Use the rolling hinge method every single time — even for small images. The habit of rolling the sheet onto the surface rather than dropping it flat is the one technique change that eliminates 90% of air bubble problems.
A cake that is too warm has soft frosting that lets the sheet slip and slide — trapping air as it moves. Too cold and condensation forms. The sweet spot is cool-firm: about 15–20 minutes in the fridge before application.
For images that cover most or all of the cake top, a fondant smoother (a flat acrylic paddle) gives you more even pressure than your hand and is less likely to create finger-dent impressions. Sweep from center to edges in overlapping strokes.
If your cake has been in the fridge and you see any fine moisture on the frosting surface, blot it gently with a clean paper towel before applying. Even a thin layer of condensation creates a slip plane that air can travel under, forming large, hard-to-fix bubbles.
Hold the sheet (still on its backing) above the cake and align it visually before making any contact. Take your time here — once the leading edge touches the frosting, repositioning becomes much harder. A few extra seconds of alignment saves minutes of bubble-chasing.
If applying a square sheet to a round cake, make small relief cuts at the corners of the sheet before placement. This lets the edges fold naturally against the curved surface instead of bunching up and trapping air at the corners.
Quick Reference: Do's and Don'ts
- Use the rolling hinge method
- Smooth from center outward
- Chill the cake 15–20 min first
- Use a smooth paper towel or fondant smoother
- Pre-align before touching the cake
- Let it set 10–15 min undisturbed
- Fix bubbles immediately while sheet is fresh
- Drop the sheet flat all at once
- Press with fingertips directly on the image
- Apply to a warm or condensation-covered cake
- Apply to a textured or lumpy frosting surface
- Reposition the sheet multiple times
- Move or jostle the cake while setting
- Press hard on a bubble — use gentle pressure
Frequently Asked Questions
Bubble-Free Application Checklist
- Frosting smoothed to a flat, even finish
- Cake chilled 15–20 minutes — firm but not frozen
- No condensation on frosting surface
- Sheet relaxed for 2–3 min after opening
- Trimmed and aligned before backing removed
- Backing peeled halfway — hinge method used
- First half rolled on slowly from one edge
- First half smoothed before second half placed
- Second half rolled down in same direction
- Full surface smoothed center → edges with paper towel
- All edges pressed down and sealed
- Cake left undisturbed 10–15 minutes to set
Get Perfect Results Every Time
Start with the best edible image sheets — premium quality frosting sheets with vibrant inks that adhere smoothly and beautifully to any frosting type.
🫧 Shop Edible Sheets at CustomEdibleSheets.com