

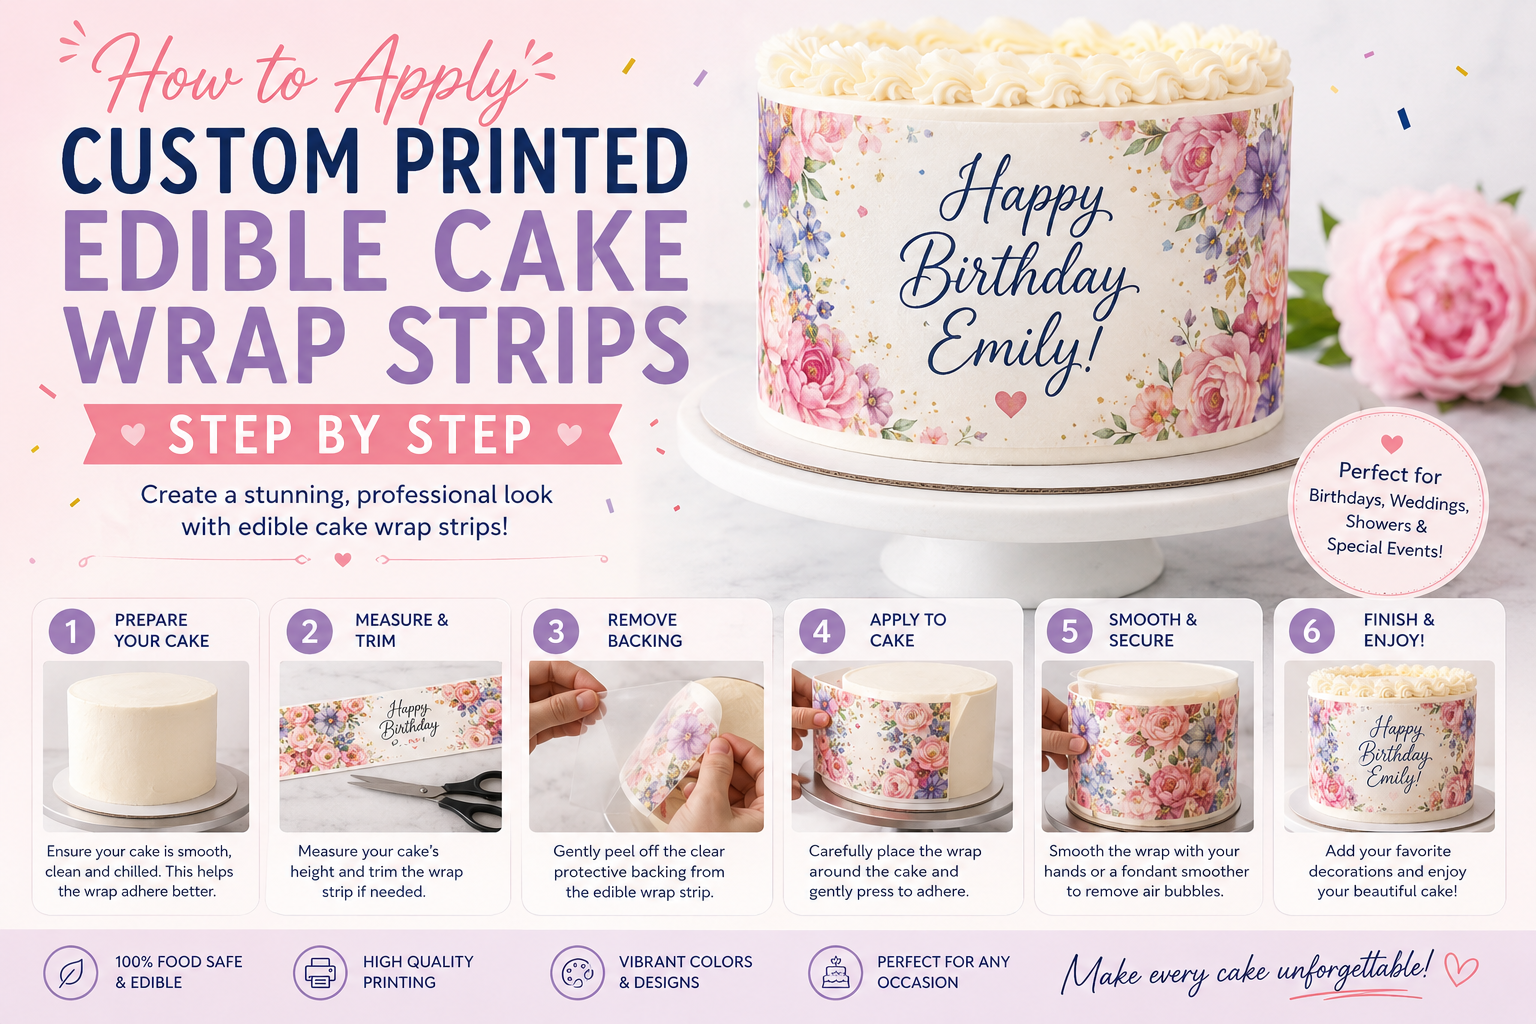
Custom Edible Cake Wrap Strips: The Ultimate Guide to Personalized Cake Side Decorations
Edible Cake Wrap Strips — What They Are, How They Work & How to Apply Them Perfectly
Turn every side of your cake into a vivid, photographic statement — no fondant skills, no piping, no artistic training required.
Most cake decorating advice focuses on the top. But the sides are what every guest sees first when a cake enters the room — the biggest, most visible canvas on any tier. Custom edible cake wrap strips transform that 360° surface into a full-color, photographic display in under ten minutes, with no special skills and no expensive equipment.
This guide walks through everything: what they're made of, how the adhesion chemistry works, which size to choose, a live circumference calculator, a fully illustrated installation diagram, and expert tips that separate a flawless finish from a frustrating one.
What Are Edible Cake Wrap Strips?
Edible cake wrap strips — also called edible cake bands, photo cake wraps, or cake side strips — are long, flexible frosting sheets (icing sheets) printed with your photo, logo, pattern, or collage using FDA-certified edible ink. They are pre-cut to exact dimensions and designed to press directly onto the frosted sides of any cake, creating a seamless custom wrap from base to top edge.
📌 Key Facts at a Glance
- Material: Premium frosting / icing sheet — thicker and more opaque than wafer paper, purpose-built for vivid side-of-cake printing
- Ink: FDA 21 CFR–compliant food-grade edible ink — tasteless, odorless, 100% food-safe
- All strips: 10 inches long — available in 2.5", 3", or 4" heights to match your cake tier
- Sets: Order 1, 2, or 3 strips to cover any cake circumference
- Arrives: Pre-cut — peel, press, smooth. No scissors or trimming needed.
- Shelf life (unused): Up to 12 months sealed flat at room temperature
- Price: Starting at $14.99 — free shipping on orders over $30
Frosting Sheet vs. Wafer Paper — Why the Material Matters
Our cake wrap strips are printed on frosting sheets, not wafer paper. Here's why that distinction matters for side-of-cake decoration:
| Property | Frosting Sheet (our wraps) | Wafer Paper |
|---|---|---|
| Opacity | ✓ Fully opaque — colors pop on any frosting | ⚠ Semi-transparent |
| Color vibrancy | ✓ Photographic, full-color detail | ⚠ Good but less vivid |
| Adhesion to buttercream | ✓ Natural bond — softens and sets | ⚠ Can slide before setting |
| Flexibility | ✓ Wraps curved sides cleanly | ✓ Very flexible |
| Taste | Mild neutral sweetness | Neutral / faint rice taste |
| Best for | ✓ Cake sides, full-coverage photo wraps | Drink toppers, burn-away effects |
For side-of-cake coverage, frosting sheets win decisively. The opacity means your design colors look exactly as intended regardless of the frosting color underneath, and the sugar-glycerin composition creates a natural bond with buttercream as it softens on contact — no glue, no adhesive, no extra step.
How It Works — Full Process Infographic
From the moment you upload your photo to a finished cake, every stage in one visual:
Why Choose Edible Cake Wrap Strips?
Full-color, high-resolution printing delivers vibrancy and detail that hand-painting, fondant cutouts, or stenciling cannot match.
Peel, press, smooth. No piping bags, no fondant sculpting, no airbrush. If you can apply a sticker, you can apply a wrap strip.
Wrap strips cover the entire visible side of the cake — the surface every guest sees first when the cake enters the room.
No plastic or paper to remove. Guests eat right through the strip — no taste change, no texture change, nothing to peel off.
Arrives trimmed to your exact dimensions. No scissors needed — one less variable on decoration day.
A hand-painted or custom-bakery side decoration can cost hundreds. Our edible wrap strips start at just $14.99.
Size Guide — Which Dimensions Do You Need?
All cake wrap strips are 10 inches long. Choose the height (2.5", 3", or 4") and the quantity based on your cake's tier height and circumference.
| Option | Dimensions | Best Tier Height | Typical Cake |
|---|---|---|---|
| 1 Strip · 10″×2.5″ | 10″ L × 2.5″ H | Accent band / 2–2.5" tier | Small 4"–5" single-layer round |
| 1 Strip · 10″×3″ | 10″ L × 3″ H | Standard 3" tier | 6" single-layer round or small square |
| 1 Strip · 10″×4″ | 10″ L × 4″ H | Tall 4" tier | 2-layer 6" round (~4" total height) |
| 3 Strips · 10″×2.5″ | 30″ total × 2.5″ H | Accent band on large cake | 9"–10" round full wrap |
| 2 Strips · 10″×3″ | 20″ total × 3″ H | Standard medium cake | 6" round full wrap with overlap |
| 2 Strips · 10″×4″ | 20″ total × 4″ H | Tall medium cake | 2-layer 6"–7" round |
How Many Strips Do You Need? — Live Calculator
Each strip is 10" long. Enter your cake's measurements below and we'll calculate the total circumference and strips needed.
🧮 Strip Count Calculator
Select your cake shape and enter its dimensions — we handle the maths.
Prefer to do the maths yourself?
🔵 Round Cakes — Diameter × 3.14
- 6″ round → 6 × 3.14 = 18.8″ → order 2 strips (20″) ✓
- 8″ round → 8 × 3.14 = 25.1″ → order 3 strips (30″) ✓
- 10″ round → 10 × 3.14 = 31.4″ → order 4 strips (40″) ✓
- 12″ round → 12 × 3.14 = 37.7″ → order 4 strips, tight join ✓
⬛ Square & Rectangle Cakes — Add All Four Sides
- 6″ × 6″ square → 6+6+6+6 = 24″ → order 3 strips ✓
- 8″ × 8″ square → 8+8+8+8 = 32″ → order 4 strips ✓
- 9″ × 13″ sheet → 9+13+9+13 = 44″ → order 5 strips ✓
Step-by-Step Installation — Illustrated Diagram
Every stage from frosted cake to finished wrap, illustrated. Full text instructions follow below.
Full Text Installation Guide — Every Step in Detail
Follow each step before you begin. The full process takes 5–10 minutes once you know what to expect. See our application tips page and instructions page for additional guidance.
Frost the cake sides with a smooth, even coat
Apply a full crumb coat and a clean final coat of buttercream, ganache, or fondant. Use a bench scraper to make the sides as flat and smooth as possible — imperfections in the frosting surface will show through the strip. The flatter the surface, the more seamless the finished result.
Chill for 15 minutes — optional but recommended
A brief chill firms the buttercream so the strip adheres more cleanly and doesn't smear during application. The surface should still feel very slightly soft and tacky — not fully set. Room-temperature fresh buttercream also works; chilling just makes the process more forgiving, especially for beginners.
Prepare the surface based on your frosting type
Fresh buttercream: Apply directly — no prep needed.
Crusted buttercream: Lightly brush with simple syrup or water to restore tack.
Fondant: Brush a thin layer of piping gel, edible glue, or water onto the fondant where the strip will sit. Wait ~30 seconds until slightly tacky before applying.
Set ganache: Brush a thin layer of piping gel, or warm very slightly with clean dry hands.
Peel the backing with completely dry hands
Dry your hands fully before touching the strip — even slight dampness begins dissolving the frosting sheet immediately. Hold the strip by its edges only. Peel the backing in one slow, smooth movement. Do not rush; a torn strip is very difficult to repair cleanly once applied.
Anchor the starting corner at the back of the cake
Start at a back-of-cake seam point — the join between strips will always be less visible from the front. Align the bottom edge of the strip with the base of the frosted side first, then press one corner gently to anchor. Don't press the full strip yet — just set the starting position.
Wrap left to right, pressing as you go
Work steadily in one direction, pressing the strip against the cake side with even, medium pressure. Keep the bottom edge aligned as you move around the curve. Where two strips meet, overlap the end of one strip over the start of the next by ¼" to eliminate visible gaps. Position all joins at the back for the cleanest front presentation.
Smooth out air bubbles from center outward
Using the back of a clean spoon, a fondant smoother, or dry fingertips, work from the center of each strip toward its edges. Move trapped air outward to the nearest open edge. Use light, consistent pressure only — aggressive pressing can stretch or tear the strip.
Allow 15–20 minutes to bond, then serve or refrigerate
The frosting sheet softens against the buttercream and bonds fully within 15–20 minutes. After this the cake can be refrigerated (loosely covered) or served. The strip continues to soften and integrate into the frosting overnight in the fridge — often the next-morning result looks even more seamless than at application.
Expert Tips for a Perfect Finish
✅ Preparation Tips
- Order at least 5–7 days before your event. Rush processing is available at checkout for last-minute needs.
- Store unused strips flat, sealed, at room temperature. Never refrigerate before applying — moisture will damage the sheet before it reaches the cake.
- Measure your frosted cake height before choosing your strip height — measure after frosting, not from the bare pan dimensions.
- Have piping gel and a clean pastry brush on standby in case any section needs extra tack mid-application.
🎨 Design Tips for Best Print Results
- Horizontal / landscape compositions fill strips naturally — strips are 10" wide and only 2.5"–4" tall, so landscape images work best.
- Repeating patterns hide joins perfectly. Florals, confetti, geometric prints, and photo collages disguise seams between strips far better than single panoramic scenes.
- Bright, well-lit photos reproduce most accurately. Very dark backgrounds will print slightly lighter on frosting sheets — this is standard for all edible printing.
- Want text on the strip? Add it using Canva before sending — our team prints exactly what you submit and does not add text or edits.
- Multi-strip panoramics: Label each file clearly ("Strip 1 – left," "Strip 2 – right") so our team prints them in the correct order.
⚠️ Mistakes to Avoid
- Wet or damp hands — the most common cause of strips tearing or dissolving before reaching the cake. Completely dry hands, every time.
- Applying to a sweating or condensation-covered cake — blot any moisture from the surface first.
- Pressing too hard — light, even pressure is all that's needed. Aggressive pressing stretches or tears the strip.
- Applying to fully crusted buttercream without restoring tack — the strip won't bond and will peel away. Always brush crusted surfaces before applying.
- Forgetting to account for frosting thickness in your strip count — order at least 1 extra strip beyond your circumference calculation.
- Refrigerating before bonding is complete — wait the full 15–20 minutes or the strip's edges can lift.
Image Requirements & File Guidelines
- Format: JPEG (.jpg) or PNG (.png) preferred. No screenshots, social media saves, or low-resolution grabs.
- Resolution: Minimum 300 DPI at print size, or at least 1,000 pixels on the shortest side. Higher is always better.
- Orientation: Landscape / horizontal format to match the strip's wide-and-short proportions.
- Text & edits: Add names, dates, or messages using Canva before sending — we print exactly what you submit.
- Multi-strip panoramics: Label each file clearly — Strip 1, Strip 2, etc. — so we print them in the correct left-to-right sequence.
- How to send: Reply to the order confirmation email you receive after purchase. Attach your file directly to the email. Production begins within 1–2 business days of receiving your image.
Perfect Occasions for Edible Cake Wrap Strips
Wrap strips pair beautifully with a matching custom edible cake topper on the top surface for complete 360° plus top-of-cake coverage — the same design on every surface, from every angle.
Food Safety & Ingredients
Our edible cake wrap strips are printed on premium frosting / icing sheets made from sugar, modified corn starch, water, and glycerin. The edible ink is FDA 21 CFR–approved — tasteless and odorless. Frosting sheets carry a very mild, neutral sweetness that blends into the cake's own frosting. Full details at our ingredients page.
Edible Wrap Strips vs. Other Side Decoration Methods
| Method | Color & Detail | Skill Needed | Fully Edible? | Cost | Time |
|---|---|---|---|---|---|
| Edible Wrap Strips | Photographic | None | ✓ Yes | From $14.99 | ~5 min |
| Hand-painted fondant | Limited detail | High — artist | ✓ Yes | $$$ | Hours |
| Fondant cutouts | Single colors | Moderate | ✓ Yes | $$ | 1–3 hr |
| Airbrush stencil | Limited gradient | Equipment + skill | ✓ Yes | $$ + equip | 30–60 min |
| Ribbon / fabric wrap | Pattern only | None | ✗ Not edible | Low | ~5 min |
Complete Your Cake — Related Products
🎂 Matching Cake Topper
Pair your wrap strip with a custom edible image cake topper in the same design for complete top-and-sides coverage — available in round, rectangle, heart, and square from 4" to 11".
🧁 Cupcake Topper Sets
Running a cupcake tower alongside the main cake? Our edible cupcake topper sets in 6, 12, 18, or 30 circles can carry the same design as your wrap strip, tying the entire dessert table together.
🍸 Edible Drink Toppers
For weddings and branded events, match your wrap strip design to custom edible drink toppers for a fully unified bar and cake table experience.
🔥 Burn-Away Cake Toppers
Combine a photo wrap on the sides with a dramatic fire-reveal on the top. Our burn-away cake toppers create an unforgettable two-moment reveal — the crowd watches the top burn while admiring the photo wrap on the sides.
Frequently Asked Questions
Ready to Transform the Sides of Your Cake?
Upload your photo and have custom printed edible cake wrap strips delivered to your door — pre-cut, pre-measured, and ready to peel and press. Starting at $14.99 with free shipping on orders over $30.
🎂 Order Your Wrap Strips Now View Size Guide