

How to Cut and Resize Edible Cake Wraps for Any Cake Size
How to Cut & Resize
Edible Cake Wraps
for Any Cake Size
Master the art of measuring, trimming, and applying edible wraps perfectly — no wasted sheets, no crooked seams, no stress.
Order Pre-Sized Edible WrapsAn edible cake wrap is only as beautiful as its fit. A perfectly cut, perfectly sized wrap makes the difference between a flawless finish and a messy overlap — and it's much easier to get right than most bakers think. This guide walks you through every step, for every cake size.
Whether you're working with a standard 6-inch round, a tall 8-inch celebration cake, or a custom novelty shape, the process for cutting and sizing edible wraps from CustomEdibleSheets.com follows the same reliable formula. Let's get into it.
Quick reference: edible wrap sizes by cake
Before you pick up any scissors, know your numbers. Use this reference chart to find the starting dimensions for the most common cake sizes. Always add a small overlap allowance when cutting.
| Cake size (round) | Circumference | Wrap width needed | Sheet type |
|---|---|---|---|
| 6 inch | approx. 18.8 in / 48 cm | 19.5 in / 50 cm | Frosting sheet |
| 8 inch | approx. 25.1 in / 64 cm | 26 in / 66 cm | Frosting sheet |
| 10 inch | approx. 31.4 in / 80 cm | 32.5 in / 83 cm | Sugar sheet |
| 12 inch | approx. 37.7 in / 96 cm | 39 in / 99 cm | Two joined sheets |
| Quarter sheet | n/a (rectangular) | 13 x 9 in / 33 x 23 cm | Wafer paper |
For square or rectangular cakes, calculate the total perimeter (sum of all four sides) and add 1 inch / 2.5 cm of overlap allowance. For novelty or sculpted cakes, use a flexible tape measure pressed gently against the frosted cake surface to get an exact perimeter reading.
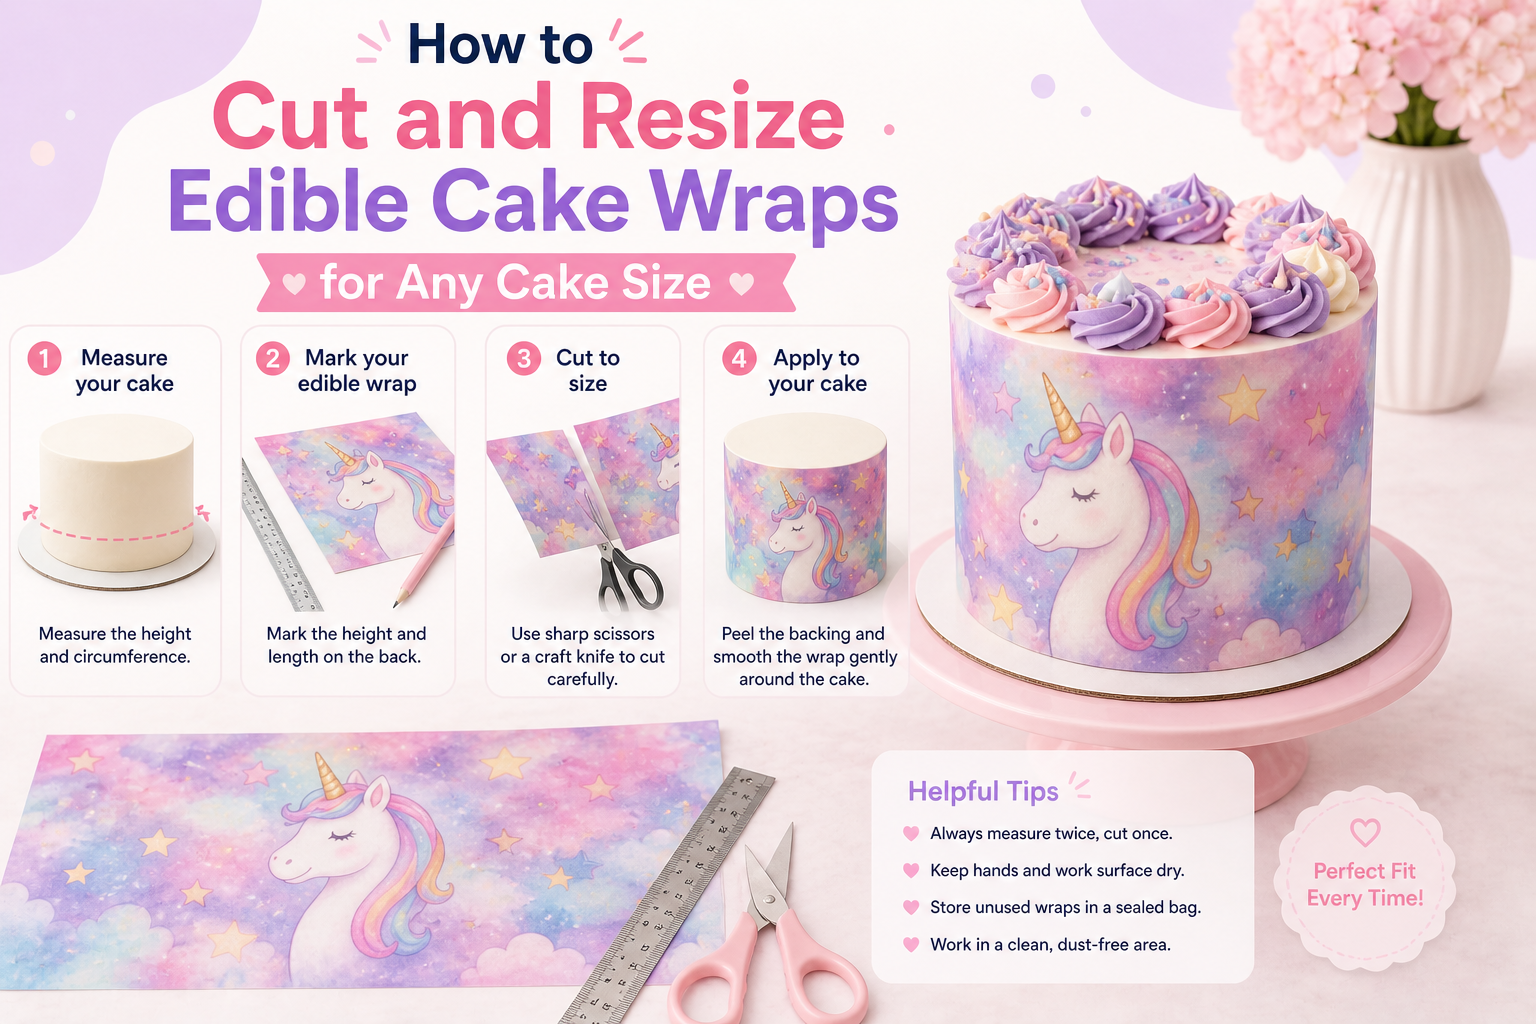
Step-by-step: how to cut and resize your edible wrap
Follow these steps in order for a clean, seamless wrap every time — from measuring your cake to smoothing the final edge.
Measure your cake — height and circumference
Use a flexible tape measure to record two numbers: the height of the frosted cake (from board to top edge) and the full circumference. For round cakes, you can calculate circumference as diameter × 3.14159. Always measure after frosting — the frosting adds height and width to the bare cake.
Pro tip: measure twice, cut onceRemove the sheet from packaging carefully
Open the sealed packaging slowly and lay the sheet face-up on a clean, dry cutting mat. Never place the printed side face-down on an unprotected surface — the ink can smear or stick. Keep the backing paper on until you are ready to cut and apply. Handle edges only.
Keep backing on during cuttingMark your cut lines lightly
Using a clean ruler and a toothpick or the back of a knife (never a pen or pencil), lightly score the backing paper at your measured dimensions. Mark the height line across the top and the width/circumference line on the right side. Double-check both measurements before cutting.
Score the backing, not the sheetCut with sharp, food-safe scissors or a craft knife
For straight horizontal cuts (top and bottom edges), a craft knife guided by a ruler gives the cleanest line. For longer vertical cuts along the width, food-safe scissors work well. Cut in one smooth continuous motion — avoid sawing or multiple short cuts, which leave jagged edges that show on the cake.
One smooth motion per cutFor large cakes — join two sheets seamlessly
Cakes larger than 10 inches typically need two sheets joined end-to-end. Lay the sheets backing-side-up and butt the edges together precisely. Apply a thin line of piping gel along the join on the backing side and press firmly. Let it rest 2 minutes before applying to the cake. Place the join at the back of the cake for an invisible seam.
Join at the back of the cakeApply, wrap, and smooth
Peel the backing from one end of the sheet. Starting at the back of the cake, press the sheet against the frosted side and slowly peel-and-press as you work around the circumference. Use a cake smoother or clean hand to press out any air pockets. At the joining point, slightly overlap (5 mm) and press firmly. Trim any excess at the seam with scissors.
Press from bottom edge upwardExpert tips for a flawless finish
These fine-tuning tips separate a good wrap from a perfect one — straight from professional cake decorators.
Chill the cake first
Refrigerate your frosted cake for 20–30 minutes before applying. A slightly firm, cold surface holds the wrap more securely and prevents slipping during application.
Work in a dry environment
Humidity is the enemy of edible sheets. On humid days, work quickly and keep unused sheets sealed until the moment of application. Air conditioning helps enormously.
Add 1 cm overlap always
Always cut your wrap 1 cm longer than the measured circumference. This overlap allowance ensures the seam closes fully even if your measurement is slightly off.
Use piping gel for wafer paper
Unlike frosting sheets which self-adhere, wafer paper needs a thin brush of piping gel on the cake surface before application. Apply the gel evenly and let it become tacky before pressing the sheet on.
Cut the top edge last
Apply the wrap with a little excess above the top of the cake, then trim the top edge flush with a clean craft knife once it's adhered. This gives a razor-sharp top finish that's impossible to achieve before application.
Dedicate your cutting tools
Use scissors and knives reserved exclusively for edible work. Any residue from regular kitchen cutting (garlic, onion, lemon) will transfer to the sheet and potentially affect flavor or food safety.
Common mistakes — and how to fix them
Troubleshooting your edible wrap
Wrap is too short and doesn't meet at the seam
You measured the bare cake before frosting. Always measure the fully frosted cake — frosting adds 1–2 cm to the diameter. Use a second strip to fill the gap, placing it at the back.
Sheet is cracking when you try to roll it
The sheet has dried out due to humidity exposure or age. Lay it flat and cover with a very slightly damp (not wet) paper towel for 2–3 minutes to soften it before attempting to bend or wrap.
Air bubbles trapped under the wrap
You applied too quickly or at the wrong angle. Use a fondant smoother to push bubbles toward the nearest edge. For persistent bubbles, use a clean pin to puncture and smooth flat.
Top edge looks ragged or uneven
You trimmed before application. Always apply first with slight excess, then trim the top edge flush using a sharp craft knife guided by a ruler once the wrap is fully adhered and set.
Best practice: order pre-sized wraps
Avoid all sizing stress by ordering custom-sized edible wraps from CustomEdibleSheets.com — just enter your exact cake dimensions and they'll print and cut to your precise measurements.